HarmonyOS《柚兔学伴》项目实战23-字帖生成与 PDF 导出
23. 字帖生成与 PDF 导出
本章导读
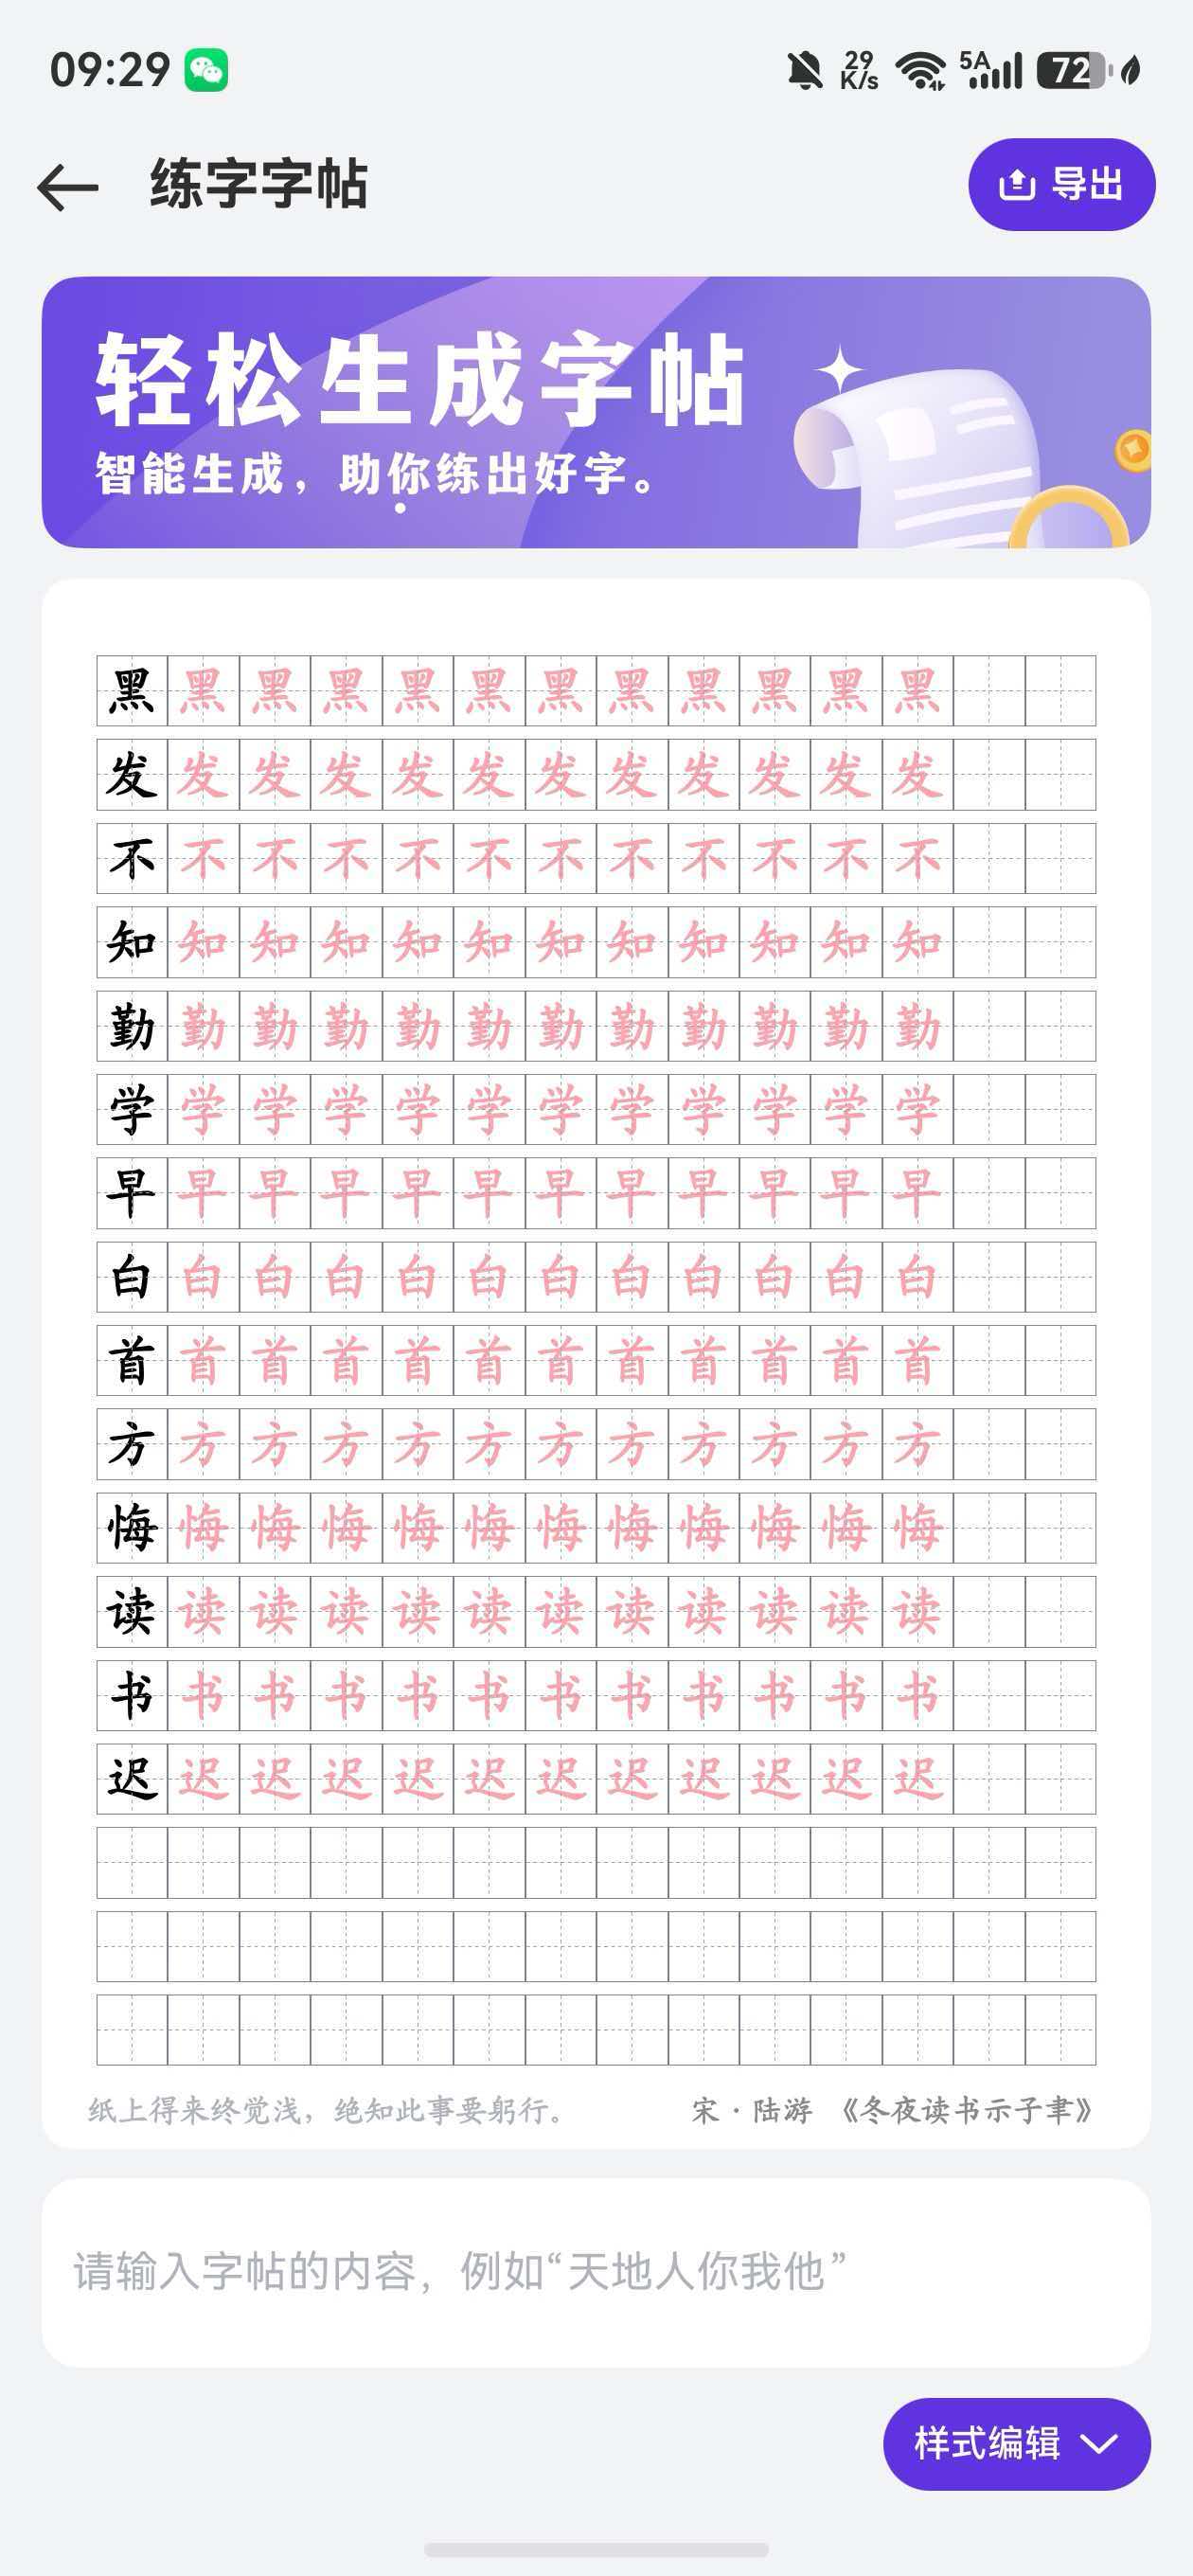
字帖是儿童练字的核心工具。「柚兔学伴」的 CopyPage 实现了可自定义方格类型、描红数量、字体颜色的字帖生成器,并支持一键导出为 PDF 文件。本章将从布局计算、自定义字体、样式编辑到 PDF 导出全链路进行详解。
23.1 A4 尺寸与方格计算
字帖需要精确匹配 A4 纸张比例,CopyPage 在 onReady 回调中根据屏幕宽度动态计算:
// CopyPage.ets
const rowTotalNum: number = 14

@Component
struct CopyPage {
  @State cellWidth: number = 0
  @State a4Width: number = 0
  @State a4height: number = 0

  build() {
    NavDestination() {
      // ...
    }
    .onReady((ctx: NavDestinationContext) => {
      this.a4Width = px2vp(display.getDefaultDisplaySync().width) - 27
      this.a4height = this.a4Width / 21 * 29.7
      this.cellWidth = (this.a4Width - 18 * 2) / rowTotalNum
      // 注册楷体字体
      font.registerFont({
        familyName: 'kaiti',
        familySrc: $rawfile('font/kaiti.ttf')
      })
      this.getWordList(this.words)
    })
  }
}
计算逻辑:
a4Width= 屏幕宽度(px转vp) - 左右边距(27vp)a4height= a4Width × 29.7/21(A4 纸长宽比)cellWidth= (a4Width - 左右内边距36vp) ÷ 每行14格
px2vp() 将物理像素转为虚拟像素,确保不同分辨率设备上布局一致。display.getDefaultDisplaySync().width 获取屏幕实际像素宽度。
23.2 自定义楷体字体
字帖必须使用楷体字才能达到练字效果。HarmonyOS 通过 font.registerFont() 注册自定义字体:
font.registerFont({
  familyName: 'kaiti',
  familySrc: $rawfile('font/kaiti.ttf')
})
注册后,在 Text 组件中通过 fontFamily('kaiti') 引用:
Text(word)
  .fontFamily('kaiti')
  .fontWeight(FontWeight.Bold)
  .fontColor(this.getTextColor(index))
  .fontSize(17)
字体文件 kaiti.ttf 存放在 rawfile/font/ 目录下,随应用打包分发。
23.3 字帖网格布局
字帖使用 Grid + ForEach 渲染字符单元格:
Grid() {
  ForEach(this.wordList, (word: string, index) => {
    GridItem() {
      Stack() {
        if (this.cellNum > index - rowTotalNum * (Math.floor(index / rowTotalNum))) {
          Text(word)
            .fontFamily('kaiti')
            .fontWeight(FontWeight.Bold)
            .fontColor(this.getTextColor(index))
            .fontSize(17)
            .width('100%')
            .height('100%')
            .textAlign(TextAlign.Center)
        }
        Image(this.cellRes).width('100%').height('100%').aspectRatio(1)
      }
    }
    .width(this.cellWidth)
    .height(this.cellWidth)
    .borderWidth(0.2)
    .borderColor($r('app.color.cell_color'))
  }, (day: string) => day)
}
.columnsTemplate(this.getRowsTemplate())
.rowsGap(4)
.padding({ left: 18, right: 18, top: 25 })
getWordList 数据生成逻辑:
getWordList(words: string) {
  const fullList: string[] = []
  const totalCells = 17 * rowTotalNum  // 17行 × 14列 = 238格

  for (let i = 0; i < 17; i++) {
    const word = words[i] ?? ''
    for (let j = 0; j < rowTotalNum; j++) {
      fullList.push(word)
    }
  }

  while (fullList.length < totalCells) {
    fullList.push('')
  }

  this.wordList = fullList
}
每个字占据一整行(14格),第一格为黑色示范字,后续格子根据描红设置显示浅色字或空白。columnsTemplate 动态生成 14 等分布局:
getRowsTemplate(): string {
  let result = '';
  for (let index = 0; index < rowTotalNum; index++) {
    result = result + '1fr ';
  }
  return result;
}
23.4 方格类型与描红颜色
四种方格类型
cellArr: string[] = ['田字格', '米字格', '回字格', '井字格']
cellResArr: Resource[] =
  [$r("app.media.cell_tzg"), $r("app.media.cell_mzg"),
   $r("app.media.cell_hgg"), $r("app.media.cell_jgg")]
每种方格对应一张背景图片资源,作为 Stack 的底层 Image 叠加在文字下方。
文字颜色逻辑
getTextColor(index: number): ResourceColor {
  if (index % 14 === 0 && this.isShowFirst) {
    return Color.Black
  }
  return this.cellColor;
}
- 每行第1格(index % 14 === 0):如果
isShowFirst为 true,显示黑色示范字 - 其余格子:使用
cellColor(浅红/浅灰/浅蓝)
三种描红颜色
colorArr: string[] = ['浅红色', '浅灰色', '浅蓝色']
colorResArr: Resource[] =
  [$r("app.color.color_font_light_red"),
   $r("app.color.color_font_light_grey"),
   $r("app.color.color_font_light_blue")]
23.5 样式编辑面板
样式编辑通过 bindSheet 半模态弹窗实现:
Row() {
  Button('样式编辑') {
    Row() {
      Text('样式编辑').fontSize(12).fontWeight(FontWeight.Medium).fontColor(Color.White).margin({ right: 5 })
      Image($r('app.media.ic_arrow_down')).width(14)
    }
  }
  .onClick(() => { this.isShow = true })
}
.bindSheet($$this.isShow, this.styleEdit(), {
  height: this.sheetHeight,
  backgroundColor: $r('app.color.color_card'),
})
面板内包含四项编辑功能:
1. 显示首字开关:
Toggle({ type: ToggleType.Switch, isOn: true })
  .selectedColor($r('app.color.app_primary'))
  .onChange((isOn: boolean) => {
    this.isShowFirst = isOn
  })
2. 方格类型选择:
使用自定义 TextWithArrowView 组件 + bindMenu 实现下拉选择:
@Component
struct TextWithArrowView {
  @Prop title: string
  @Prop content: string
  @BuilderParam textMenu: () => void

  build() {
    Row() {
      Text(this.title)
      Blank();
      Row() {
        Text(this.content).margin({ left: 7 }).fontSize(12)
        Image($r('app.media.ic_arrow_down')).width(12).fillColor($r('app.color.color_font_light_grey'))
      }
      .border({ width: 0.1, color: $r('app.color.cell_color') })
      .borderRadius(20)
      .bindMenu(this.textMenu())
    }.width('100%')
  }
}
3. 描红颜色选择: 同样的 Menu 下拉模式。
4. 描红数量滑块:
Slider({
  value: this.cellNum,
  min: 0,
  max: rowTotalNum,
  style: SliderStyle.InSet
})
  .width(100)
  .onChange((value: number, mode: SliderChangeMode) => {
    this.cellNum = value
  })
Text(this.cellNum + '').width(20).textAlign(TextAlign.End)
Slider 范围 0~14,控制每行中显示描红字的数量。cellNum 为 0 时整行空白供自由书写,为 14 时全行描红。
23.6 自定义内容输入
使用 IBestDialog 弹窗让用户输入字帖内容:
IBestDialog({
  visible: $dialogVisible,
  title: "字帖内容",
  showCancelButton: true,
  defaultBuilder: (): void => this.formInputContain(),
  beforeClose: (action) => {
    if (action === 'cancel') { return true }
    const valueLength = this.inputValue.trim().length
    this.formInputError = !valueLength
    return !this.formInputError
  },
  onConfirm: (() => {
    this.getWordList(this.inputValue.trim())
  })
})
beforeClose 返回 false 可阻止弹窗关闭,实现表单验证:输入为空时显示错误提示,不关闭弹窗。
@Builder
formInputContain() {
  Column({ space: 12 }) {
    TextInput({ placeholder: '请输入字帖内容' })
      .onChange(value => {
        this.inputValue = value
        this.formInputError = false
      })
    if (this.formInputError) {
      Text('不能为空')
        .width("100%")
        .textAlign(TextAlign.Start)
        .fontColor(Color.Red)
        .fontSize(12)
    }
  }.padding(20)
}
23.7 PDF 导出全流程
导出 PDF 是 CopyPage 最核心的进阶功能,涉及截图、PNG 转换、PDF 生成、文件选择器四步:
第一步:组件截图
let pixelMap = componentSnapshot.getSync(this.COPY_WORK, {
  scale: 2,
  waitUntilRenderFinished: true
})
this.COPY_WORK是目标 Column 的id标识scale: 2提升输出分辨率waitUntilRenderFinished: true确保渲染完成后截图
第二步:PixelMap 保存为 PNG
let resDir = context.cacheDir
let timestamp = Date.now();
ImageUtil.savePixelMap(pixelMap, resDir, timestamp.toString()).then((pngPath: string) => {
  // 后续 PDF 操作...
})
PNG 保存到应用沙箱缓存目录,以时间戳命名避免冲突。
第三步:创建 PDF 并嵌入图片
const pdfDoc = new pdfService.PdfDocument();
pdfDoc.createDocument(
  pixelMap.getImageInfoSync().size.width,
  pixelMap.getImageInfoSync().size.height
)
const page = pdfDoc.getPage(0);
page.addImageObject(pngPath, 0, 0, page.getWidth(), page.getHeight());
let sandPdfPath = `${resDir}/${timestamp}.pdf`
const result: boolean = pdfDoc.saveDocument(sandPdfPath);
@kit.PDFKit 提供的 pdfService.PdfDocument 可创建空白 PDF 文档,将 PNG 图片作为对象添加到页面。文档尺寸与截图一致,保证内容不变形。
第四步:系统文件选择器保存
let documentSaveOptions = new picker.DocumentSaveOptions();
let name = DateUtil.getFormatDateStr(timestamp, 'yyyy-MM-dd-HH-mm-ss')
documentSaveOptions.newFileNames = [`柚兔字帖_${name}.pdf`];
documentSaveOptions.fileSuffixChoices = ['.pdf'];

let documentViewPicker = new picker.DocumentViewPicker();
documentViewPicker.save(documentSaveOptions).then(async (uris) => {
  const documentUri = uris[0];

  // 读取沙箱 PDF 文件
  const fileContent = await fs.open(sandPdfPath, fs.OpenMode.READ_ONLY);
  const stat = await fs.stat(sandPdfPath);
  const buffer = new ArrayBuffer(stat.size);
  await fs.read(fileContent.fd, buffer);
  await fs.close(fileContent.fd);

  // 写入用户选择的保存位置
  const documentFile = await fs.open(documentUri, fs.OpenMode.READ_WRITE | fs.OpenMode.CREATE);
  await fs.write(documentFile.fd, buffer);
  await fs.close(documentFile.fd);

  // 清理临时文件
  await fs.unlink(sandPdfPath);
  ToastUtil.showToast('保存成功')
})
完整流程总结:
组件截图 → PixelMap → PNG文件 → PDF文档(嵌入图片) → 沙箱PDF
    → 文件选择器(用户选路径) → 读取沙箱 → 写入目标URI → 清理临时文件
注意:HarmonyOS 的安全模型不允许应用直接写入公共目录,必须通过 DocumentViewPicker 让用户选择保存位置,再通过 URI 读写。
23.8 资源释放
PDF 导出完成后务必释放文档对象:
pdfDoc.releaseDocument();
同时清理沙箱中的临时 PNG 和 PDF 文件:
await fs.unlink(sandPdfPath);
本章小结
本章完整拆解了字帖生成与 PDF 导出的实现。核心要点包括:A4 尺寸的动态计算与 Grid 网格布局;楷体字体的注册与应用;四种方格类型和描红颜色的灵活切换;以及从组件截图到 PDF 生成再到系统文件选择器的完整导出链路。CopyPage 展示了 HarmonyOS 中 componentSnapshot、@kit.PDFKit、DocumentViewPicker 三大能力的协同使用模式。下一章将介绍积分系统与礼品兑换功能。

讨论HarmonyOS开发技术,专注于API与组件、DevEco Studio、测试、元服务和应用上架分发等。
更多推荐
 7
7 0
0- 0


 已为社区贡献100条内容

所有评论(0)