HarmonyOs应用《日记本》开发第17篇 - 日记编辑页面 DiaryEdit 详解
·
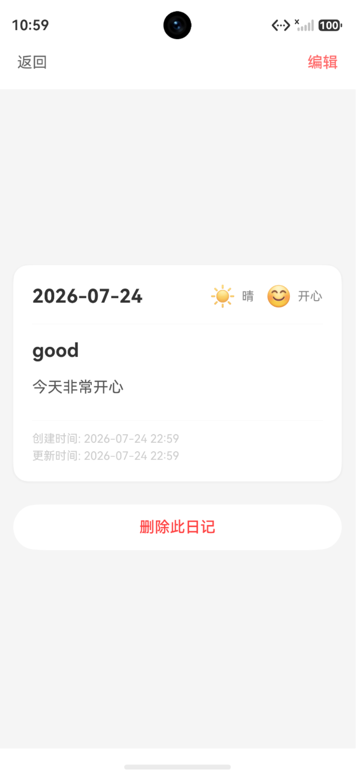
本篇详细分析日记编辑页面的实现,包括表单输入、日期选择、天气心情标签选择以及数据保存逻辑。
一、页面功能概述
DiaryEdit 页面是日记应用的核心交互页面,承担了"新建"和"编辑"两种模式:
- 新建模式:初始化空表单,保存时创建新日记
- 编辑模式:加载已有日记数据,保存时更新内容
- 日期选择:通过 DatePicker 选择日记日期
- 天气/心情标签:从预设选项中选择
- 内容输入:多行文本输入区域
二、页面状态设计
2.1 状态变量
@Entry
@Component
struct DiaryEdit {
  @State diary: DiaryInfo = new DiaryInfo()
  @State isEditMode: boolean = false
  @State selectedDate: Date = new Date()
  @State showDatePicker: boolean = false
  @State showDeleteConfirm: boolean = false
  @State contentInput: string = ''
  @State selectedWeather: Weather = Weather.SUNNY
  @State selectedMood: Mood = Mood.HAPPY

  private store: DiaryStore = DiaryStore.getInstance()
  private editId: string = ''
}
状态变量说明:
| 变量 | 类型 | 用途 |
|---|---|---|
diary |
DiaryInfo | 当前编辑的日记对象 |
isEditMode |
boolean | 区分新建/编辑模式 |
selectedDate |
Date | 选中的日期 |
showDatePicker |
boolean | 控制日期选择器显示 |
contentInput |
string | 绑定文本输入框内容 |
selectedWeather |
Weather | 当前选中的天气 |
selectedMood |
Mood | 当前选中的心情 |
2.2 模式判断
aboutToAppear() {
  const params = router.getParams() as Record<string, string>
  if (params && params.mode === 'edit' && params.id) {
    this.isEditMode = true
    this.editId = params.id
    this.loadDiary(params.id)
  } else {
    this.isEditMode = false
    this.diary.date = this.formatDate(new Date())
    this.selectedDate = new Date()
  }
}
逻辑分析:
- 从路由参数获取
mode和id - 若
mode === 'edit',进入编辑模式,加载已有数据 - 否则进入新建模式,设置默认日期为今天
三、页面布局结构
3.1 整体布局
┌──────────────────────────────┐
│  ← 返回        保存          │  顶部导航栏
├──────────────────────────────┤
│  📅 2026-07-24        ▼      │  日期选择行
├──────────────────────────────┤
│  天气: ☀️ ☁️ 🌧️ ⛅ 🌨️        │  天气标签
├──────────────────────────────┤
│  心情: 😊 😐 😢 😡 😴        │  心情标签
├──────────────────────────────┤
│                              │
│  今天发生了什么...            │  内容输入区
│                              │
│                              │
│                              │
├──────────────────────────────┤
│              [删除日记]       │  仅编辑模式显示
└──────────────────────────────┘
3.2 顶部导航栏
Row() {
  // 返回按钮
  Text('返回')
    .fontSize(16)
    .onClick(() => {
      router.back()
    })

  // 标题
  Text(this.isEditMode ? '编辑日记' : '新建日记')
    .fontSize(18)
    .fontWeight(FontWeight.Bold)
    .layoutWeight(1)
    .textAlign(TextAlign.Center)

  // 保存按钮
  Text('保存')
    .fontSize(16)
    .fontColor('#007DFF')
    .onClick(() => {
      this.saveDiary()
    })
}
.width('100%')
.height(56)
.padding({ left: 16, right: 16 })
四、日期选择功能
4.1 日期显示行
Row() {
  Image($r('app.media.calendar'))
    .width(20)
    .height(20)
  Text(this.formatDate(this.selectedDate))
    .fontSize(16)
    .layoutWeight(1)
  Image($r('app.media.arrow_down'))
    .width(16)
    .height(16)
}
.padding(16)
.onClick(() => {
  this.showDatePicker = true
})
4.2 DatePicker 弹窗
if (this.showDatePicker) {
  DatePickerDialog.show({
    start: new Date('2020-01-01'),
    end: new Date(),
    selected: this.selectedDate,
    onAccept: (value: DatePickerResult) => {
      this.selectedDate = new Date(value.year, value.month, value.day)
      this.diary.date = this.formatDate(this.selectedDate)
      this.showDatePicker = false
    },
    onCancel: () => {
      this.showDatePicker = false
    }
  })
}
DatePickerDialog 参数说明:
| 参数 | 说明 |
|---|---|
start |
可选最早日期 |
end |
可选最晚日期 |
selected |
默认选中日期 |
onAccept |
确认选择回调 |
onCancel |
取消选择回调 |
4.3 日期格式化
private formatDate(date: Date): string {
  const year = date.getFullYear()
  const month = (date.getMonth() + 1).toString().padStart(2, '0')
  const day = date.getDate().toString().padStart(2, '0')
  return `${year}-${month}-${day}`
}
格式化要点:
- 月份需要 +1(
getMonth()返回 0-11) - 使用
padStart(2, '0')保证两位数格式 - 最终输出
YYYY-MM-DD格式
五、天气与心情选择
5.1 天气标签组
Text('天气')
  .fontSize(14)
  .fontColor('#666')
  .margin({ top: 16, left: 16 })

Flex({ wrap: FlexWrap.Wrap }) {
  ForEach(WeatherList, (item: WeatherItem, index: number) => {
    Text(item.label)
      .fontSize(16)
      .padding({ left: 16, right: 16, top: 8, bottom: 8 })
      .margin(4)
      .borderRadius(20)
      .backgroundColor(
        this.selectedWeather === item.value ? '#007DFF' : '#F5F5F5'
      )
      .fontColor(
        this.selectedWeather === item.value ? '#FFFFFF' : '#333333'
      )
      .onClick(() => {
        this.selectedWeather = item.value
        this.diary.weather = item.label
      })
  })
}
.padding({ left: 12, right: 12 })
5.2 心情标签组
Text('心情')
  .fontSize(14)
  .fontColor('#666')
  .margin({ top: 16, left: 16 })

Flex({ wrap: FlexWrap.Wrap }) {
  ForEach(MoodList, (item: MoodItem, index: number) => {
    Text(item.label)
      .fontSize(16)
      .padding({ left: 16, right: 16, top: 8, bottom: 8 })
      .margin(4)
      .borderRadius(20)
      .backgroundColor(
        this.selectedMood === item.value ? '#007DFF' : '#F5F5F5'
      )
      .fontColor(
        this.selectedMood === item.value ? '#FFFFFF' : '#333333'
      )
      .onClick(() => {
        this.selectedMood = item.value
        this.diary.mood = item.label
      })
  })
}
标签选择设计模式:
- 使用
Flex组件实现自动换行布局 - 选中状态通过背景色和文字颜色区分
- 圆角胶囊形状符合现代标签设计风格
- 点击即选中,支持切换
六、内容输入区
TextArea({ text: this.contentInput, placeholder: '今天发生了什么...' })
  .width('100%')
  .height(200)
  .fontSize(16)
  .padding(16)
  .borderRadius(12)
  .backgroundColor('#FAFAFA')
  .onChange((value: string) => {
    this.contentInput = value
    this.diary.content = value
  })
TextArea 关键属性:
| 属性 | 说明 |
|---|---|
text |
输入框当前文本 |
placeholder |
占位提示文字 |
onChange |
文本变化回调 |
height |
输入区域高度 |
七、数据保存逻辑
7.1 表单验证
private validateInput(): boolean {
  if (this.contentInput.trim().length === 0) {
    promptAction.showToast({
      message: '请输入日记内容',
      duration: 2000
    })
    return false
  }
  return true
}
7.2 保存方法
private async saveDiary() {
  if (!this.validateInput()) {
    return
  }

  // 组装日记数据
  this.diary.content = this.contentInput
  this.diary.date = this.formatDate(this.selectedDate)

  try {
    if (this.isEditMode) {
      this.diary.id = this.editId
      await this.store.updateDiary(this.diary)
      promptAction.showToast({ message: '保存成功', duration: 1500 })
    } else {
      this.diary.id = this.generateId()
      this.diary.createTime = Date.now()
      await this.store.addDiary(this.diary)
      promptAction.showToast({ message: '创建成功', duration: 1500 })
    }
    router.back()
  } catch (error) {
    promptAction.showToast({
      message: '保存失败,请重试',
      duration: 2000
    })
    console.error('保存日记失败: ' + error)
  }
}
保存流程:
用户点击保存
    │
    ▼
表单验证 ──失败──→ 显示错误提示
    │
   通过
    │
    ▼
判断模式
    │
    ├──新建──→ 生成ID → 添加日记 → Toast提示 → 返回
    │
    └──编辑──→ 设置ID → 更新日记 → Toast提示 → 返回
7.3 ID 生成
private generateId(): string {
  return Date.now().toString() + Math.random().toString(36).substr(2, 9)
}
ID 生成策略:
- 时间戳保证全局递增性
- 随机字符串防止同一毫秒创建的日记冲突
- 最终格式示例:
1721845678901a3b7c2d
八、删除功能
仅在编辑模式下显示删除按钮:
if (this.isEditMode) {
  Button('删除日记')
    .width('90%')
    .height(48)
    .fontSize(16)
    .fontColor('#FF3B30')
    .backgroundColor('#FFFFFF')
    .borderRadius(12)
    .margin({ top: 24 })
    .onClick(() => {
      this.showDeleteConfirm = true
    })
}
删除确认弹窗将在后续章节详细讨论。
九、加载已有数据
private async loadDiary(id: string) {
  try {
    const diary = await this.store.getDiaryById(id)
    if (diary) {
      this.diary = diary
      this.contentInput = diary.content
      this.selectedDate = this.parseDate(diary.date)
      this.selectedWeather = this.getWeatherByLabel(diary.weather)
      this.selectedMood = this.getMoodByLabel(diary.mood)
    }
  } catch (error) {
    console.error('加载日记失败: ' + error)
    promptAction.showToast({ message: '加载失败', duration: 2000 })
  }
}
十、总结
DiaryEdit 页面的设计要点:
- 双模式复用:新建和编辑共用同一页面,通过状态变量区分
- 表单数据绑定:
@State变量与 UI 组件双向同步 - 标签选择器:Flex + 条件样式实现标签组
- 异步保存:async/await 处理 Preferences 存储
- 用户反馈:Toast 提示操作结果
- 数据验证:前端验证防止空内容提交
这些模式是鸿蒙表单页面的典型实现,适用于各类编辑场景。

讨论HarmonyOS开发技术,专注于API与组件、DevEco Studio、测试、元服务和应用上架分发等。
更多推荐

 10
10 0
0- 0


 已为社区贡献104条内容

所有评论(0)