HarmonyOS 6.1 游戏开发实战:FlappyBird完整实现
鸿蒙领航者
·
本文详细讲解如何使用ArkTS在HarmonyOS 6.1上开发一个完整的FlappyBird游戏,包括游戏架构设计、物理引擎、碰撞检测、状态管理等核心技术。通过本项目,你将掌握HarmonyOS游戏开发的关键技能。
📋 目录
- 项目概述
- 技术架构
- 物理引擎实现
- 碰撞检测算法
- 游戏状态管理
- 数据持久化
- 音效系统
- 成就系统
- 粒子效果
- 总结与展望
一、项目概述
1.1 游戏简介
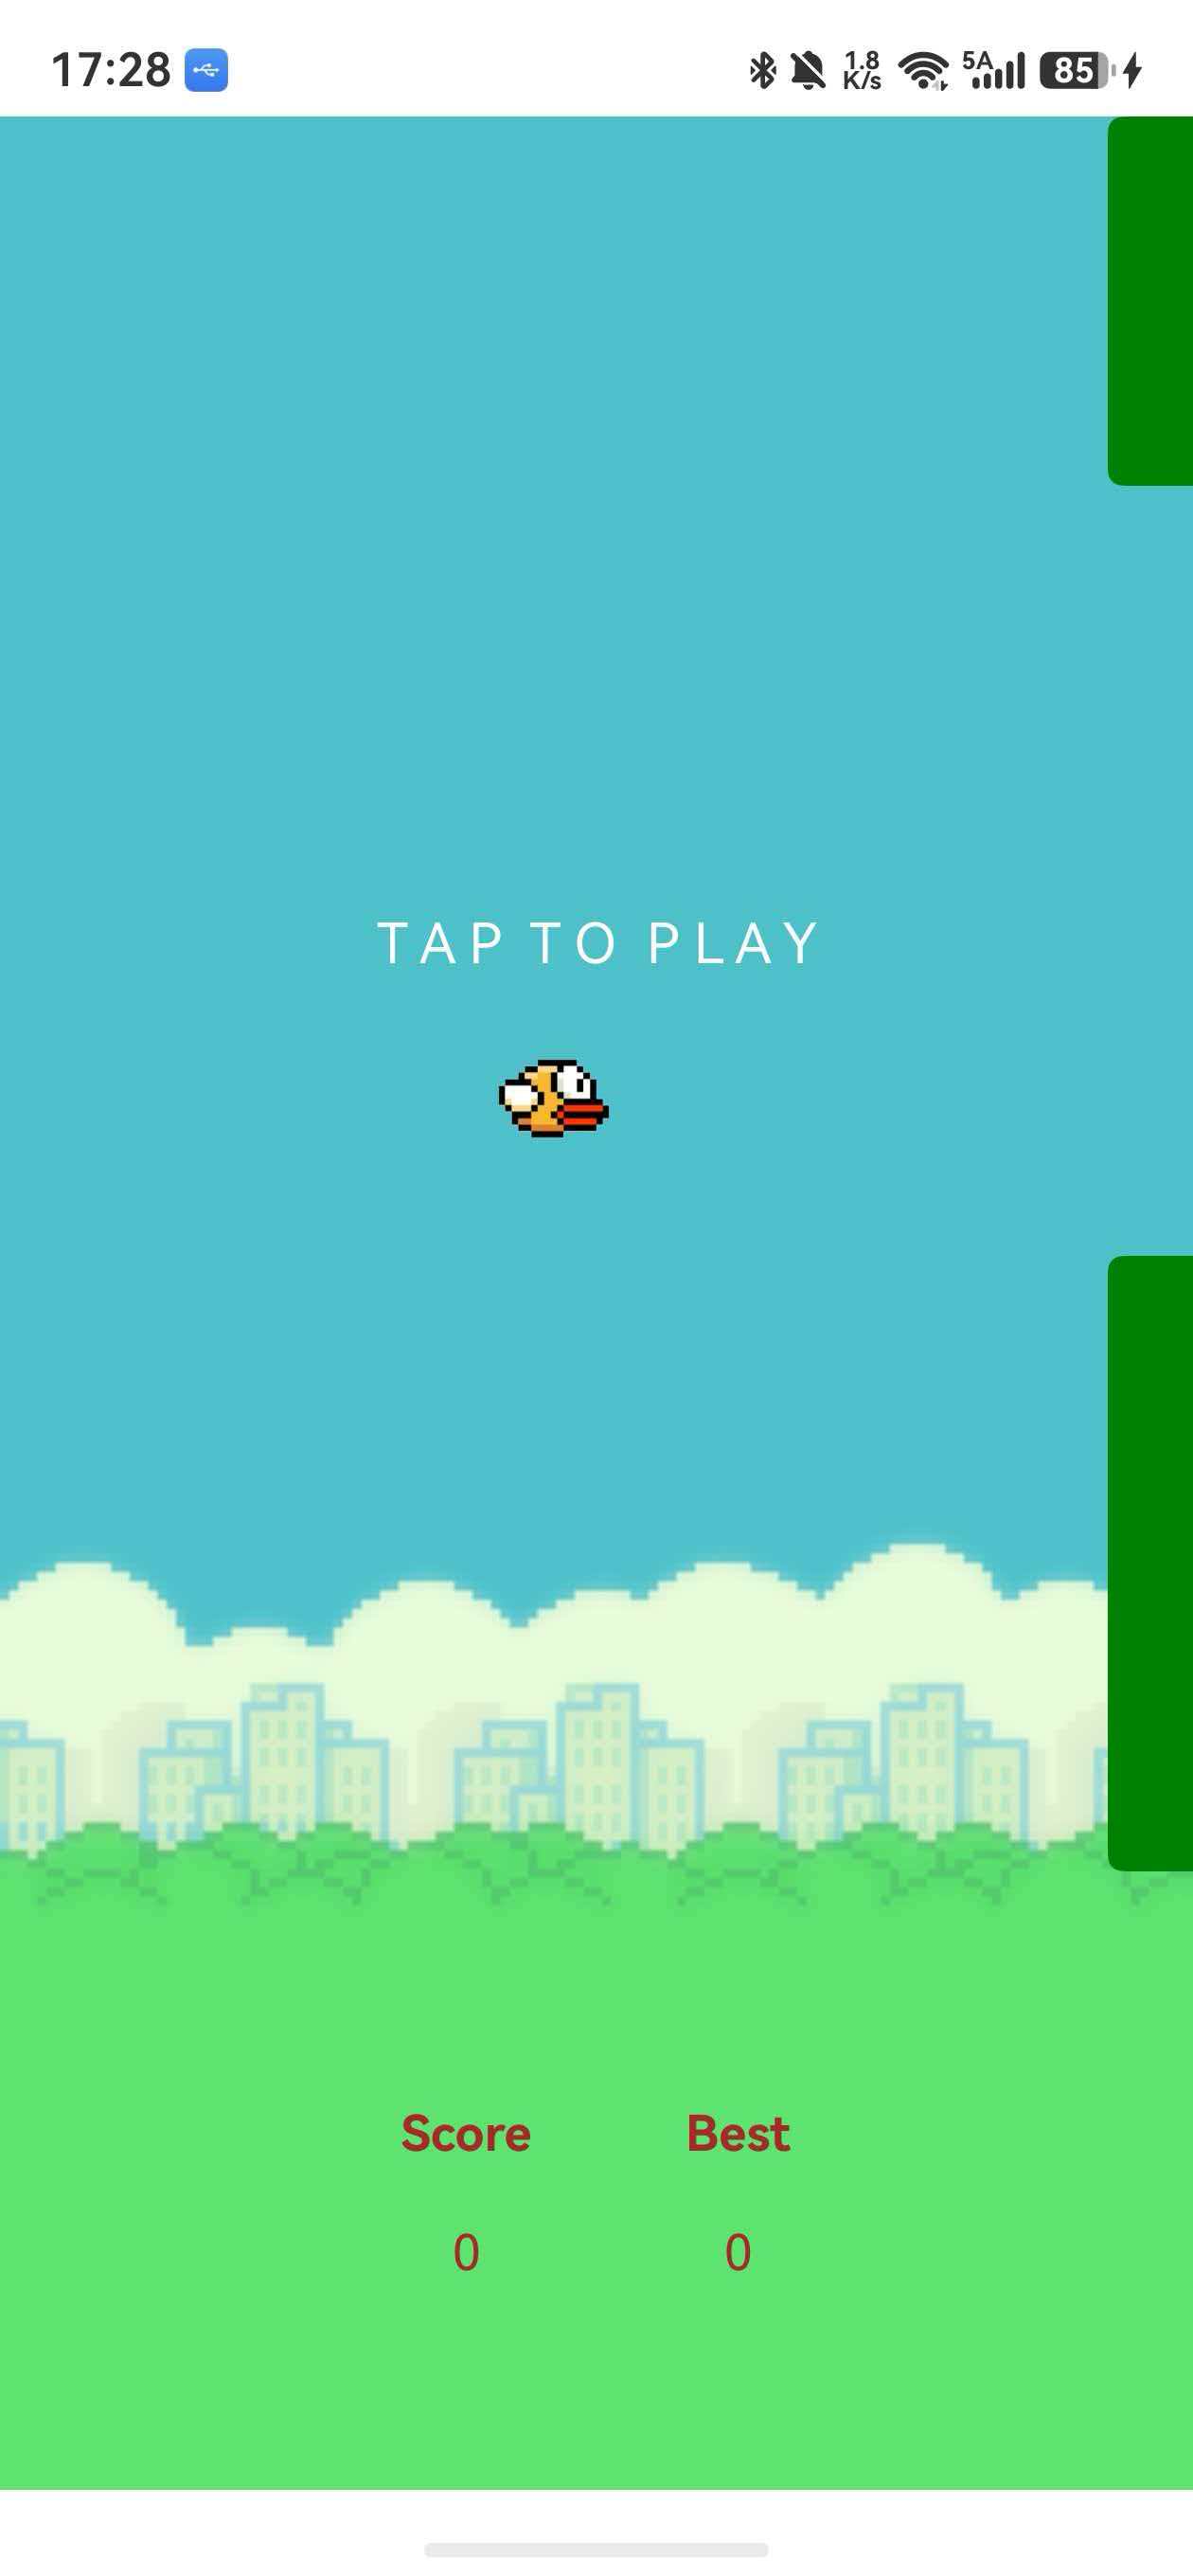
FlappyBird是一款简单但极富挑战性的休闲游戏。玩家通过点击屏幕控制小鸟跳跃,避开障碍物,尽可能获得高分。
1.2 技术栈
- 开发语言:ArkTS
- UI框架:ArkUI
- HarmonyOS版本:6.1
- 核心技术:
- Canvas 2D渲染
- Preferences数据持久化
- AVPlayer音效播放
- Lottie动画
- 自定义组件
1.3 功能特性
✅ 完整的游戏循环
✅ 物理引擎模拟(重力、跳跃)
✅ 精确的碰撞检测
✅ 数据持久化(最高分、游戏次数)
✅ 音效系统(跳跃、得分、死亡)
✅ 成就系统(5种成就)
✅ 粒子特效(死亡爆炸、得分特效)
✅ 优雅的UI设计
二、技术架构
2.1 整体架构设计
FlappyBird/
├── pages/
│   ├── Index.ets           # 主游戏页面
│   ├── Barriers.ets        # 障碍物组件
│   └── CustomDialog.ets    # 游戏结束对话框
├── utils/
│   ├── StorageManager.ets      # 数据持久化管理
│   ├── SoundManager.ets        # 音效管理
│   ├── AchievementManager.ets  # 成就管理
│   └── ParticleSystem.ets      # 粒子系统
└── resources/
    └── rawfile/
        ├── lottie/         # Lottie动画
        └── sounds/         # 音效资源
2.2 核心模块
1. 游戏主循环(Index.ets)
- 游戏状态管理
- 物理计算
- 碰撞检测
- UI渲染
2. 工具模块
StorageManager:数据存储SoundManager:音效播放AchievementManager:成就解锁ParticleSystem:粒子渲染
三、物理引擎实现
3.1 重力模拟
游戏中的小鸟受重力影响自由下落,使用抛物线运动公式:
公式: h = v₀t - ½gt²
其中:
h:高度变化v₀:初始速度(跳跃时给定)g:重力加速度t:时间
代码实现:
@State time: number = 0              // 时间参数
@State h: number = 0                 // 高度变化量
@State initHeight: number = 160      // 初始高度
@State birdY: number = 300           // 小鸟Y坐标

// 游戏循环中更新物理状态
startGame() {
  this.isGameStart = true
  let timeId = setInterval(() => {
    this.time += 0.05  // 时间步进

    // 抛物线运动公式:h = v₀t - ½gt²
    // 490 ≈ ½g,250是初始速度
    this.h = -490 * this.time * this.time + 250 * this.time

    // 更新小鸟位置
    this.birdY = this.initHeight - this.h

  }, 60)  // 每60ms更新一次,约16.7fps
}
3.2 跳跃机制
每次点击屏幕,重置时间和初始高度,模拟"给小鸟一个向上的初速度":
birdJump() {
  this.time = 0                    // 重置时间
  this.initHeight = this.birdY     // 以当前位置为新起点
  this.soundManager.play(SoundType.JUMP)  // 播放跳跃音效
}
关键点:
- 不是直接改变Y坐标,而是重置物理参数
- 这样能保持物理运动的连续性和真实感
3.3 参数调优
// 重力系数:影响下落速度
const GRAVITY = 490  // 值越大,下落越快

// 初始速度:影响跳跃高度
const INITIAL_VELOCITY = 250  // 值越大,跳得越高

// 时间步进:影响物理更新频率
const TIME_STEP = 0.05  // 值越小,运动越平滑
调优技巧:
- 先调整重力,让下落速度合理
- 再调整初速度,使跳跃高度适中
- 最后微调时间步进,优化流畅度
四、碰撞检测算法
4.1 碰撞检测逻辑
游戏中的碰撞分两种:
- 边界碰撞:小鸟超出屏幕上下边界
- 障碍物碰撞:小鸟与管道障碍物重叠
4.2 代码实现
birdIsDead(): boolean {
  // 1. 检查上下边界碰撞
  if (this.birdY <= 0 || this.birdY >= this.displayHeight * 0.75) {
    return true
  }

  // 2. 检查障碍物碰撞
  for (let i = 0; i < this.barrierX.length; i++) {
    // 判断水平方向是否重叠
    const horizontalCollision =
      this.barrierX[i] <= (this.birdX + 40) &&  // 障碍物左边 <= 小鸟右边
      this.barrierX[i] >= this.birdX              // 障碍物右边 >= 小鸟左边

    // 判断垂直方向是否碰撞
    const verticalCollision =
      this.heightArr[i][0] >= this.birdY ||  // 碰到上方管道
      (this.displayHeight * 0.75 - this.heightArr[i][1]) <= this.birdY  // 碰到下方管道

    if (horizontalCollision && verticalCollision) {
      return true
    }
  }

  return false
}
4.3 碰撞检测优化
AABB包围盒算法(Axis-Aligned Bounding Box)
// 优化版本:使用矩形包围盒
interface Rect {
  x: number
  y: number
  width: number
  height: number
}

checkCollision(rect1: Rect, rect2: Rect): boolean {
  return rect1.x < rect2.x + rect2.width &&
         rect1.x + rect1.width > rect2.x &&
         rect1.y < rect2.y + rect2.height &&
         rect1.y + rect1.height > rect2.y
}

// 使用示例
const bird: Rect = { x: this.birdX, y: this.birdY, width: 40, height: 40 }
const barrier: Rect = { x: this.barrierX[i], y: 0, width: 50, height: this.heightArr[i][0] }

if (this.checkCollision(bird, barrier)) {
  // 发生碰撞
}
五、游戏状态管理
5.1 状态定义
@State isGameStart: boolean = false    // 游戏是否开始
@State score: number = 0               // 当前分数
@State bestScore: number = 0           // 最高分
@State birdX: number = 160             // 小鸟X坐标
@State birdY: number = 300             // 小鸟Y坐标
@State barrierX: number[] = [360, 480, 600]  // 障碍物位置
5.2 游戏循环
startGame() {
  this.isGameStart = true

  // 主游戏循环:物理更新和碰撞检测
  let timeId = setInterval(() => {
    // 更新物理状态
    this.time += 0.05
    this.h = -490 * this.time * this.time + 250 * this.time
    this.birdY = this.initHeight - this.h

    // 移动障碍物
    for (let i = 0; i < this.barrierX.length; i++) {
      this.barrierX[i] -= 10
    }

    // 更新粒子系统
    this.particleSystem.update()

    // 碰撞检测
    if (this.birdIsDead()) {
      clearInterval(timeId)
      this.isGameStart = false
      this.soundManager.play(SoundType.DIE)
      this.particleSystem.createExplosion(this.birdX + 20, this.birdY + 20, '#FF0000', 15)
      this.checkAchievements()
      this.saveBestScore()
      this.dialogController.open()
    }

    // 障碍物循环
    if (this.barrierX[0] === -50) {
      this.barrierX[0] = this.displayWidth
    }
  }, 60)

  // 计分循环:每2秒得1分
  let scoreId = setInterval(() => {
    if (this.birdIsDead()) {
      clearInterval(scoreId)
      this.score = 0
    } else {
      this.score++
      this.soundManager.play(SoundType.SCORE)
      this.particleSystem.createExplosion(this.birdX + 20, this.birdY, '#FFD700', 8)
    }
  }, 2000)
}
5.3 游戏重置
restartGame() {
  this.isGameStart = false
  this.time = 0
  this.initHeight = 160
  this.birdY = 300
  this.score = 0
  this.barrierX = [this.displayWidth, this.displayWidth + 120, this.displayWidth + 240]
}
六、数据持久化
6.1 StorageManager设计
使用单例模式封装Preferences API:
import preferences from '@ohos.data.preferences';

export class StorageManager {
  private static instance: StorageManager;
  private pref: preferences.Preferences | null = null;
  private readonly STORE_NAME = 'flappybird_data';

  private constructor() {}

  static getInstance(): StorageManager {
    if (!StorageManager.instance) {
      StorageManager.instance = new StorageManager();
    }
    return StorageManager.instance;
  }

  async init(context: Context): Promise<void> {
    try {
      this.pref = await preferences.getPreferences(context, this.STORE_NAME);
    } catch (err) {
      console.error(`Failed to init preferences: ${err}`);
    }
  }

  async setBestScore(score: number): Promise<void> {
    await this.pref?.put('bestScore', score);
    await this.pref?.flush();
  }

  async getBestScore(): Promise<number> {
    return (await this.pref?.get('bestScore', 0)) as number;
  }
}
6.2 使用示例
// 初始化
async aboutToAppear() {
  const context = getContext(this) as common.UIAbilityContext
  await this.storageManager.init(context)
  this.bestScore = await this.storageManager.getBestScore()
}

// 保存数据
async saveBestScore() {
  if (this.score > this.bestScore) {
    this.bestScore = this.score
    await this.storageManager.setBestScore(this.bestScore)
  }
}
七、音效系统
7.1 SoundManager设计
import media from '@ohos.multimedia.media';

export enum SoundType {
  JUMP = 'jump',
  SCORE = 'score',
  DIE = 'die'
}

export class SoundManager {
  private static instance: SoundManager;
  private players: Map<string, media.AVPlayer> = new Map();
  private enabled: boolean = true;

  static getInstance(): SoundManager {
    if (!SoundManager.instance) {
      SoundManager.instance = new SoundManager();
    }
    return SoundManager.instance;
  }

  async loadSound(type: SoundType, path: string): Promise<void> {
    try {
      const player = await media.createAVPlayer();
      player.url = path;
      this.players.set(type, player);
    } catch (err) {
      console.error(`Failed to load sound ${type}: ${err}`);
    }
  }

  play(type: SoundType): void {
    if (!this.enabled) return;

    const player = this.players.get(type);
    if (player) {
      player.seek(0);
      player.play();
    }
  }
}
7.2 集成到游戏
// 加载音效
async aboutToAppear() {
  await this.soundManager.loadSound(SoundType.JUMP, 'rawfile://sounds/jump.mp3')
  await this.soundManager.loadSound(SoundType.SCORE, 'rawfile://sounds/score.mp3')
  await this.soundManager.loadSound(SoundType.DIE, 'rawfile://sounds/die.mp3')
}

// 播放音效
birdJump() {
  this.soundManager.play(SoundType.JUMP)
}
八、成就系统
8.1 成就定义
export interface Achievement {
  id: string
  title: string
  description: string
  unlocked: boolean
}

const achievements: Achievement[] = [
  { id: 'first_score', title: '初次尝试', description: '获得第一分', unlocked: false },
  { id: 'score_10', title: '崭露头角', description: '单局达到10分', unlocked: false },
  { id: 'score_50', title: '高手之路', description: '单局达到50分', unlocked: false },
  { id: 'games_10', title: '坚持不懈', description: '游玩10局游戏', unlocked: false },
  { id: 'new_record', title: '破纪录', description: '创造新的最高分', unlocked: false }
]
8.2 成就检查逻辑
async checkAchievements() {
  // 检查分数成就
  if (this.score >= 1) {
    await this.achievementManager.checkAndUnlock('first_score')
  }
  if (this.score >= 10) {
    await this.achievementManager.checkAndUnlock('score_10')
  }
  if (this.score >= 50) {
    await this.achievementManager.checkAndUnlock('score_50')
  }

  // 检查游戏次数成就
  this.gameCount++
  await this.storageManager.setGameCount(this.gameCount)
  if (this.gameCount >= 10) {
    await this.achievementManager.checkAndUnlock('games_10')
  }
}
九、粒子效果系统
9.1 粒子数据结构
export interface Particle {
  x: number       // X坐标
  y: number       // Y坐标
  vx: number      // X方向速度
  vy: number      // Y方向速度
  life: number    // 剩余生命
  maxLife: number // 最大生命
  color: string   // 颜色
  size: number    // 大小
}
9.2 粒子系统实现
export class ParticleSystem {
  private particles: Particle[] = []

  // 创建爆炸效果
  createExplosion(x: number, y: number, color: string, count: number = 10): void {
    for (let i = 0; i < count; i++) {
      const angle = (Math.PI * 2 * i) / count
      this.particles.push({
        x: x,
        y: y,
        vx: Math.cos(angle) * (2 + Math.random() * 3),
        vy: Math.sin(angle) * (2 + Math.random() * 3),
        life: 60,
        maxLife: 60,
        color: color,
        size: 3 + Math.random() * 3
      })
    }
  }

  // 更新粒子状态
  update(): void {
    this.particles = this.particles.filter(p => {
      p.x += p.vx
      p.y += p.vy
      p.vy += 0.2  // 重力效果
      p.life--
      return p.life > 0
    })
  }

  // 渲染粒子
  render(context: CanvasRenderingContext2D): void {
    this.particles.forEach(p => {
      const alpha = p.life / p.maxLife
      context.globalAlpha = alpha
      context.fillStyle = p.color
      context.fillRect(p.x, p.y, p.size, p.size)
    })
    context.globalAlpha = 1
  }
}
9.3 集成到游戏
// 添加粒子Canvas
Stack() {
  // 游戏元素...

  // 粒子效果层
  Canvas(this.particleContext)
    .width('100%')
    .height('100%')
    .backgroundColor(Color.Transparent)
    .onReady(() => {
      setInterval(() => {
        this.particleContext.clearRect(0, 0, this.displayWidth, this.displayHeight * 0.75)
        this.particleSystem.render(this.particleContext)
      }, 16)
    })
}

// 触发粒子效果
// 死亡时:红色爆炸
this.particleSystem.createExplosion(this.birdX + 20, this.birdY + 20, '#FF0000', 15)

// 得分时:金色粒子
this.particleSystem.createExplosion(this.birdX + 20, this.birdY, '#FFD700', 8)
十、UI设计与优化
10.1 开始界面
Column() {
  Text('FLAPPY BIRD')
    .fontSize(32)
    .fontColor('#FFD700')
    .fontWeight(FontWeight.Bold)
    .margin({ top: 50, bottom: 20 })

  Text(`最高分: ${this.bestScore}`)
    .fontSize(20)
    .fontColor(Color.White)
    .margin({ bottom: 10 })

  Text(`已玩: ${this.gameCount} 局`)
    .fontSize(16)
    .fontColor('#CCCCCC')
    .margin({ bottom: 30 })

  Text('T A P  T O  P L A Y')
    .fontColor(Color.White)
    .fontSize(18)
    .margin({ bottom: 20 })

  Text(`成就: ${this.achievementManager.getUnlockedCount()}/5`)
    .fontSize(14)
    .fontColor('#90EE90')
}
.visibility(this.isGameStart ? Visibility.Hidden : Visibility.Visible)
10.2 游戏结束对话框
使用Lottie动画增强视觉效果:
@CustomDialog
export struct GameOverDialog {
  private animatePath: string = "lottie/failed.json"
  private context: CanvasRenderingContext2D = new CanvasRenderingContext2D()
  controller: CustomDialogController
  confirm: () => void = () => {}

  build() {
    Column() {
      Text('Oops...').fontSize(22).margin({ top: 30, bottom: 30 })

      Canvas(this.context)
        .width(120)
        .height(120)
        .onReady(() => {
          lottie.loadAnimation({
            container: this.context,
            renderer: "canvas",
            loop: true,
            autoplay: true,
            name: "gameOver",
            path: this.animatePath,
          })
        })

      Button('play again')
        .onClick(() => {
          this.controller.close()
          this.confirm()
        })
    }
  }
}
十一、性能优化
11.1 渲染优化
// 1. 使用状态管理避免不必要的重绘
@State birdY: number = 300  // 只在需要更新UI时才触发重绘

// 2. 合理设置更新频率
setInterval(() => {
  // 游戏逻辑更新
}, 60)  // 60ms,约16fps,平衡性能与流畅度

// 3. Canvas离屏渲染
private offscreenCanvas: CanvasRenderingContext2D = new CanvasRenderingContext2D()
11.2 内存管理
// 及时清理定时器
if (this.birdIsDead()) {
  clearInterval(timeId)
  clearInterval(scoreId)
}

// 释放资源
aboutToDisappear() {
  this.soundManager.release()
  lottie.destroy(this.animateName)
}
十二、总结与展望
12.1 技术总结
本项目完整实现了一个FlappyBird游戏,涵盖了以下核心技术:
| 技术点 | 实现方案 | 难度 |
|---|---|---|
| 物理引擎 | 抛物线运动公式 | ⭐⭐⭐ |
| 碰撞检测 | AABB包围盒算法 | ⭐⭐⭐ |
| 状态管理 | @State装饰器 | ⭐⭐ |
| 数据持久化 | Preferences API | ⭐⭐ |
| 音效系统 | AVPlayer | ⭐⭐ |
| 粒子效果 | Canvas粒子系统 | ⭐⭐⭐⭐ |
| 动画 | Lottie | ⭐⭐ |
12.2 关键收获
- 物理模拟:理解并应用抛物线运动公式
- 碰撞检测:掌握AABB算法原理
- 模块化设计:工具类封装提高代码复用性
- 性能优化:合理使用定时器和Canvas
- 用户体验:音效、动画、粒子提升游戏品质
12.3 可扩展方向
功能扩展:
- ✨ 多种游戏模式(简单、困难、无尽)
- ✨ 皮肤系统(更换小鸟、障碍物样式)
- ✨ 排行榜(本地/在线)
- ✨ 更多成就类型
- ✨ 背景音乐
技术优化:
- 🚀 使用状态机管理游戏状态
- 🚀 实现对象池优化性能
- 🚀 添加难度递增系统
- 🚀 接入云数据库实现全球排行榜
12.4 学习建议
- 先理解物理原理:重力、速度、加速度
- 分步实现:先做基础游戏循环,再添加功能
- 多调试参数:找到最佳的游戏手感
- 注重用户体验:音效、动画、反馈缺一不可
完整代码结构
@Entry
@Component
struct Index {
  // 游戏状态
  @State isGameStart: boolean = false
  @State score: number = 0
  @State bestScore: number = 0

  // 物理参数
  @State birdY: number = 300
  @State time: number = 0
  @State h: number = 0

  // 管理器
  private storageManager = StorageManager.getInstance()
  private soundManager = SoundManager.getInstance()
  private achievementManager = AchievementManager.getInstance()
  private particleSystem = new ParticleSystem()

  async aboutToAppear() {
    // 初始化所有管理器
  }

  startGame() {
    // 游戏主循环
  }

  birdJump() {
    // 跳跃逻辑
  }

  birdIsDead(): boolean {
    // 碰撞检测
  }

  build() {
    // UI布局
  }
}
项目源码
本文示例代码:项目源码
参考资料
如果本文对你有帮助,欢迎点赞、收藏、关注!
下一篇预告:《HarmonyOS 6.1 Canvas粒子效果系统从零实现》

讨论HarmonyOS开发技术,专注于API与组件、DevEco Studio、测试、元服务和应用上架分发等。
更多推荐

 6
6 0
0- 0


 已为社区贡献46条内容

所有评论(0)