HarmonyOS 6 LED滚动实战之 MainPage 核心逻辑拆解:屏幕旋转、文字测量、Marquee 一次说清
文章目录
MainPage 是整个项目的核心,150 行代码,但有几个点值得仔细看——屏幕旋转怎么触发、全屏怎么实现、Marquee 的字符串为什么要用 MeasureUtils 处理。这篇逐一拆开。
先看成员变量初始化
MainPage 一上来就做了些初始化工作,这部分容易被忽略:
// MainPage.ets
struct MainPage {
  screenWidth: number = display.getDefaultDisplaySync().width;
  scaledDensity: number = display.getDefaultDisplaySync().scaledDensity;
  screenHeight: number = display.getDefaultDisplaySync().height;
  context: common.UIAbilityContext = this.getUIContext()?.getHostContext() as common.UIAbilityContext;
  windowClass: window.Window = (this.context as common.UIAbilityContext).windowStage.getMainWindowSync();
screenWidth 和 screenHeight 是物理像素值,scaledDensity 是屏幕密度(DPI 缩放比)。
字体大小的初始化就用了这俩:
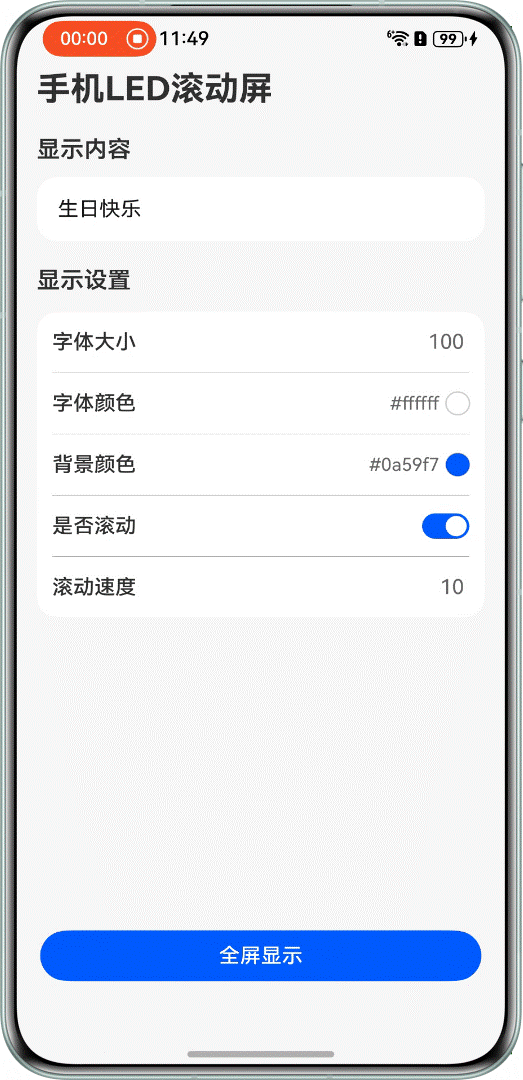
@State contentFontSize: number = Math.floor(this.screenWidth / this.scaledDensity);
物理像素 ÷ 屏幕密度 = 逻辑像素(vp)。这样初始字号刚好等于屏幕宽度对应的 vp 值,字撑满整个屏宽,LED 效果够震撼。这个计算是个小技巧,不是随便写的数字。
windowClass 通过 windowStage.getMainWindowSync() 同步获取,后面控制横屏、全屏都靠它。
点击"开始展示"按钮,发生了什么
Button($r('app.string.start_display'))
  .onClick(() => {
    this.contentStrNormalize = this.getMarqueeSrc();
    this.isFullScreen = true;
    this.windowClass.setWindowLayoutFullScreen(true);
    this.windowClass.setPreferredOrientation(window.Orientation.LANDSCAPE);
    this.topMargin = this.getUIContext()
      .px2vp(this.windowClass.getWindowAvoidArea(window.AvoidAreaType.TYPE_SYSTEM).topRect.height)
    this.windowClass.setWindowSystemBarEnable([]);
  })
按顺序:
getMarqueeSrc()处理文字内容(下面细讲)isFullScreen = true触发 UI 切换到 Marquee 视图setWindowLayoutFullScreen(true)让布局延伸到状态栏/导航栏区域setPreferredOrientation(LANDSCAPE)强制横屏- 计算状态栏高度并存到
topMargin(给返回按钮用) setWindowSystemBarEnable([])隐藏状态栏和导航栏,彻底沉浸
这六步顺序很重要——要先设内容,再切视图,再改方向,避免闪屏。
返回按钮的显示逻辑
全屏模式下,用户点击屏幕才显示返回按钮:
if (this.isFullScreen) {
  if (this.isButtonVisible) {
    Button($r('app.string.back'))
      .zIndex(Constants.Z_INDEX)
      .margin({ top: this.topMargin })
      .onClick(() => {
        this.isFullScreen = false;
        this.isButtonVisible = false;
        this.windowClass.setWindowLayoutFullScreen(false);
        this.windowClass.setWindowSystemBarEnable(['status', 'navigation']);
        this.windowClass.setPreferredOrientation(window.Orientation.PORTRAIT);
      })
  }
  Marquee({ ... })
    .onClick(() => {
      this.isButtonVisible = !this.isButtonVisible;
    })
}
isButtonVisible 控制返回按钮的可见性,点 Marquee 区域切换显示。返回按钮的 margin.top 用的是之前算好的 topMargin,这样在刘海屏/打孔屏上按钮不会被遮住。
退出全屏时,按原路恢复:关全屏布局 → 恢复状态栏 → 切回竖屏。
getMarqueeSrc:为什么要补充空格?
这个方法是 MainPage 里最有意思的一段:
getMarqueeSrc(): ResourceStr {
  // 测量文字宽度(物理像素)
  this.contentStrWidth = this.uiContextMeasure.measureText({
    textContent: this.contentStr,
    fontSize: this.contentFontSize
  });
  // 测量一个空格的宽度
  this.spaceWidth = this.uiContextMeasure.measureText({
    textContent: ' ',
    fontSize: this.contentFontSize
  });

  if (this.contentStrWidth > this.screenHeight) {
    return this.contentStr
  }

  if (this.whetherScroll) {
    return this.contentStr + ' '.repeat(this.screenHeight / this.spaceWidth) + this.contentStr;
  } else {
    return this.contentStr;
  }
}
先解释为什么要处理:Marquee 组件在文字宽度小于容器宽度时不会滚动(或者滚动效果很奇怪)。横屏后屏幕变成了 screenHeight(原来的高度)宽,如果文字内容没有撑满这个宽度,Marquee 就没有"滚动空间"。
解决方案:在第一段文字和第二段文字之间补空格,让总宽度超过屏幕宽度。空格数量 = screenHeight / spaceWidth,正好能让文字滚动起来形成 LED 效果。
注意这里用的是 MeasureUtils.measureText 而不是随便估一个值——字号不同,同样的字符宽度差很大,必须精确测量。
Marquee 的完整配置
Marquee({
  start: this.whetherScroll,
  step: this.scrollSpeed,
  loop: Constants.INFINITE_LOOP,  // -1 无限循环
  src: this.contentStrNormalize.toString(),
})
  .width(Constants.FULL_PERCENT)
  .height(Constants.FULL_PERCENT)
  .fontSize(this.contentFontSize)
  .fontColor(this.contentFontColor)
  .align(Alignment.Center)
  .onStart(() => {
    hilog.info(0x0000, 'testTag', 'Succeeded in completing the onStart callback of marquee animation');
  })
  .onBounce(() => {
    hilog.info(0x0000, 'testTag', 'Succeeded in completing the onBounce callback of marquee animation');
  })
  .onFinish(() => {
    hilog.info(0x0000, 'testTag', 'Succeeded in completing the onFinish callback of marquee animation');
  })
几个关键参数:
start绑定whetherScroll,用户配置关闭滚动时静止展示step就是滚动速度,来自scrollSpeedloop = -1是INFINITE_LOOP常量,代表无限循环src传的是处理过的字符串contentStrNormalize,不是原始contentStr
onStart/onBounce/onFinish 三个回调在这里只是打了日志,但在实际项目中可以用来做更多事——比如统计播放次数、到达边界时触发震动等。
安全区域的处理
Stack(...)
  .expandSafeArea([SafeAreaType.SYSTEM], [SafeAreaEdge.TOP, SafeAreaEdge.BOTTOM])
expandSafeArea 让内容延伸到系统安全区域(状态栏、导航栏)之外。对于 LED 屏这种全屏沉浸式应用,这行很重要——不加的话,横屏后四周会留白边,影响效果。
一个值得注意的细节
context: common.UIAbilityContext = this.getUIContext()?.getHostContext() as common.UIAbilityContext;
windowClass: window.Window = (this.context as common.UIAbilityContext).windowStage.getMainWindowSync();
windowClass 是在组件初始化时同步获取的,用的是 getMainWindowSync。这里要注意:成员变量赋值发生在 aboutToAppear 之前,所以 context 和 windowClass 在组件构建时就已经准备好了。
如果换成异步 getMainWindow,就需要在 aboutToAppear 里做,不能这样直接初始化。
写在最后
MainPage 代码不多,但涉及的 API 不少:display 获取屏幕信息、window 控制横屏和全屏、MeasureUtils 精确测量文字、Marquee 实现滚动效果。这几个 API 各自独立,但在这个场景里被串在一起用得很顺。
下一篇讲 ContentConfig 配置面板,看看那些选项行是怎么组织的,以及 CustomDialogController 怎么接颜色选择器。

讨论HarmonyOS开发技术,专注于API与组件、DevEco Studio、测试、元服务和应用上架分发等。
更多推荐


 2
2 0
0- 0


 已为社区贡献150条内容

所有评论(0)