鸿蒙6.0应用开发——接入DeepSeek API教程
鸿蒙6.0应用开发——接入DeepSeek API教程
文章目录
场景介绍
随着大语言模型技术的快速发展,将AI能力集成到移动应用中已成为提升用户体验的重要手段。DeepSeek作为一款高性能的大语言模型,具备强大的文本生成、代码理解和对话能力,且完全兼容 OpenAI API 接口格式,非常适合在鸿蒙应用中集成。
本章将详细介绍如何在鸿蒙6.0应用中接入 DeepSeek API,实现一个完整的 AI 智能聊天助手。通过 ArkUI 构建聊天界面,使用 @ohos.net.http 进行网络请求,实现用户与 DeepSeek 模型的实时对话交互。
运作机制
鸿蒙应用接入 DeepSeek API 的整体架构如下图所示,用户通过 ArkUI 界面输入消息,应用层将消息封装为 HTTP 请求发送至 DeepSeek 服务端,服务端返回 AI 响应后在界面上展示。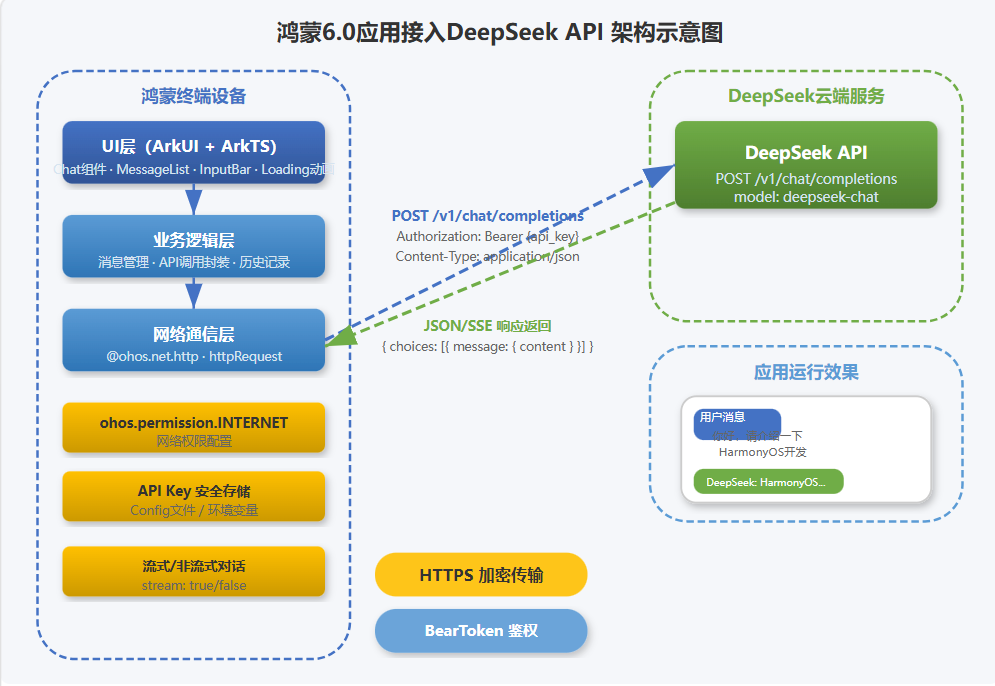
图1 鸿蒙6.0应用接入DeepSeek API 架构示意图
核心交互流程如下:
- 用户输入消息:用户在聊天界面的输入框中输入文本内容,点击发送按钮触发消息处理。
- 消息封装:应用将用户消息按 DeepSeek API 的格式封装为 JSON 请求体,包含
model(模型名称)、messages(对话历史)等参数。 - HTTP 请求发送:通过
@ohos.net.http创建 HTTP 请求,设置请求头(包含 API Key 鉴权信息),向 DeepSeek API 端点发送 POST 请求。 - 响应接收:DeepSeek 服务端返回包含 AI 回复的 JSON 响应,应用解析
choices[0].message.content字段获取回复内容。 - 界面更新:将 AI 回复添加到消息列表中,ArkUI 响应式更新界面展示。
接口说明
DeepSeek API 兼容 OpenAI 格式,以下是本次开发需要使用的核心接口:
DeepSeek API 接口
| 接口名称 | 描述 |
|---|---|
POST /v1/chat/completions |
创建对话补全,发送消息列表并获取模型回复 |
Authorization: Bearer <API_KEY> |
请求头鉴权,替换为你的 DeepSeek API Key |
Content-Type: application/json |
请求体格式为 JSON |
请求参数说明
| 参数名 | 类型 | 必填 | 描述 |
|---|---|---|---|
model |
string | 是 | 模型名称,如 deepseek-chat |
messages |
array | 是 | 对话消息列表,格式为 [{role, content}] |
temperature |
number | 否 | 生成温度,范围 0~2,默认 1.0 |
stream |
boolean | 否 | 是否流式返回,默认 false |
鸿蒙 HTTP 接口
| 接口名称 | 描述 |
|---|---|
http.createHttp() |
创建 HTTP 请求对象 |
httpRequest.request(url, options) |
发起 HTTP 网络请求 |
httpRequest.destroy() |
销毁 HTTP 请求对象 |
约束限制
- 使用前需在 DeepSeek 官网 注册账号并获取 API Key。
- DeepSeek API 调用会产生费用,请关注官方定价策略。
- 网络请求需要在子线程中执行,不能阻塞主线程。
- API Key 不应硬编码在代码中,建议通过配置文件或环境变量管理。
- 鸿蒙应用需配置
ohos.permission.INTERNET权限才能发起网络请求。 - 长对话场景下,需合理管理
messages数组大小,避免超出 Token 限制。 - 建议使用
finally确保请求结束后销毁 HTTP 对象,防止内存泄漏。
开发步骤
1. 创建工程并配置网络权限
打开 DevEco Studio,创建一个新的 Empty Ability 工程,选择 ArkTS 语言。
在 module.json5 文件中添加网络权限:
{
  "module": {
    "requestPermissions": [
      {
        "name": "ohos.permission.INTERNET"
      }
    ],
    "abilities": [
      {
        "name": "EntryAbility",
        "srcEntry": "./ets/entryability/EntryAbility.ets",
        "description": "$string:EntryAbility_desc",
        "icon": "$media:icon",
        "label": "$string:EntryAbility_label",
        "startWindowIcon": "$media:icon",
        "startWindowBackground": "$string:app_name",
        "exported": true
      }
    ]
  }
}
在 src/main/resources/rawfile/ 目录下创建 config.json 文件,用于存储 API Key 和模型配置:
{
  "deepseek_api_key": "sk-你的DeepSeekAPIKey",
  "model": "deepseek-chat",
  "base_url": "https://api.deepseek.com/v1/chat/completions"
}
安全提示:生产环境中建议将 API Key 存储在系统资产管理(SystemAsset)中,或通过云端配置下发,避免硬编码在应用包内。
2. 封装 API 请求层
创建 model/DeepSeekModel.ets 文件,封装与 DeepSeek API 的通信逻辑:
import { http } from "@kit.NetworkKit";
import { BusinessError } from "@kit.BasicServicesKit";

// 消息角色枚举
export enum Role {
  SYSTEM = "system",
  USER = "user",
  ASSISTANT = "assistant"
}

// 消息数据模型
export interface Message {
  role: Role | string;
  content: string;
}

// API 请求参数
interface ChatRequest {
  model: string;
  messages: Message[];
  temperature?: number;
  stream?: boolean;
}

// API 响应结构
interface ChatResponse {
  id: string;
  object: string;
  created: number;
  model: string;
  choices: Array<{
    index: number;
    message: {
      role: string;
      content: string;
    };
    finish_reason: string;
  }>;
  usage: {
    prompt_tokens: number;
    completion_tokens: number;
    total_tokens: number;
  };
}

// DeepSeek API 配置
const API_BASE_URL = "https://api.deepseek.com/v1/chat/completions";
const API_MODEL = "deepseek-chat";

// 获取 API Key(从资源文件中读取)
function getApiKey(): string {
  // 生产环境建议使用 SystemAsset 安全存储
  // 此处简化处理,实际应从安全存储中获取
  return "sk-请替换为你的DeepSeekAPIKey";
}

// 发送聊天请求
export async function sendChatMessage(
  messages: Message[],
  temperature: number = 0.7
): Promise<string> {
  const apiKey = getApiKey();
  const httpRequest = http.createHttp();

  try {
    const requestBody: ChatRequest = {
      model: API_MODEL,
      messages: messages,
      temperature: temperature,
      stream: false
    };

    const response = await httpRequest.request(API_BASE_URL, {
      method: http.RequestMethod.POST,
      header: {
        "Content-Type": "application/json",
        "Authorization": `Bearer ${apiKey}`
      },
      extraData: JSON.stringify(requestBody),
      expectDataType: http.HttpDataType.STRING,
      usingCache: false,
      connectTimeout: 30000,
      readTimeout: 60000
    });

    if (response.responseCode === 200) {
      const result: ChatResponse = JSON.parse(response.result as string);
      if (result.choices && result.choices.length > 0) {
        return result.choices[0].message.content;
      }
      throw new Error("API 返回结果为空");
    } else {
      throw new Error(`HTTP 请求失败,状态码: ${response.responseCode}`);
    }
  } catch (error) {
    const bizErr = error as BusinessError;
    throw new Error(`请求异常: ${bizErr.message || JSON.stringify(bizErr)}`);
  } finally {
    httpRequest.destroy();
  }
}
3. 构建聊天界面
创建 pages/ChatPage.ets 文件,实现聊天界面的 UI 布局:
import { sendChatMessage, Message, Role } from "../model/DeepSeekModel";

// 聊天消息视图模型
interface ChatMessage {
  id: string;
  role: Role;
  content: string;
  timestamp: number;
  isLoading?: boolean;
}

@Entry
@Component
struct ChatPage {
  // 消息列表状态
  @State messages: ChatMessage[] = [];
  // 输入框内容
  @State inputText: string = "";
  // 是否正在请求中
  @State isLoading: boolean = false;

  // 消息列表控制器
  private listScroller: Scroller = new Scroller();
  // 消息 ID 计数器
  private messageCounter: number = 0;

  aboutToAppear(): void {
    // 添加欢迎消息
    this.addSystemMessage(
      "你好!我是 AI 智能助手,基于 DeepSeek 大语言模型。请问有什么可以帮助你的?"
    );
  }

  // 添加系统消息(AI 回复)
  addSystemMessage(content: string): void {
    this.messages.push({
      id: `msg_${this.messageCounter++}`,
      role: Role.ASSISTANT,
      content: content,
      timestamp: Date.now()
    });
  }

  // 添加用户消息
  addUserMessage(content: string): void {
    this.messages.push({
      id: `msg_${this.messageCounter++}`,
      role: Role.USER,
      content: content,
      timestamp: Date.now()
    });
  }

  // 发送消息
  async onSendMessage(): Promise<void> {
    const text = this.inputText.trim();
    if (!text || this.isLoading) return;

    // 清空输入框
    this.inputText = "";
    // 添加用户消息
    this.addUserMessage(text);

    // 显示加载状态
    this.isLoading = true;
    const loadingMsg: ChatMessage = {
      id: `msg_loading_${this.messageCounter++}`,
      role: Role.ASSISTANT,
      content: "",
      timestamp: Date.now(),
      isLoading: true
    };
    this.messages.push(loadingMsg);

    try {
      // 构建消息历史
      const historyMessages: Message[] = this.messages
        .filter(msg => !msg.isLoading && msg.content.length > 0)
        .map(msg => ({
          role: msg.role,
          content: msg.content
        }));

      // 调用 DeepSeek API
      const reply = await sendChatMessage(historyMessages);

      // 替换加载消息为实际回复
      const loadIndex = this.messages.indexOf(loadingMsg);
      if (loadIndex !== -1) {
        this.messages[loadIndex] = {
          id: `msg_reply_${this.messageCounter++}`,
          role: Role.ASSISTANT,
          content: reply,
          timestamp: Date.now(),
          isLoading: false
        };
      }
    } catch (error) {
      // 异常处理:替换加载消息为错误提示
      const errorIndex = this.messages.indexOf(loadingMsg);
      if (errorIndex !== -1) {
        this.messages[errorIndex] = {
          id: `msg_error_${this.messageCounter++}`,
          role: Role.ASSISTANT,
          content: `抱歉,请求出现了异常:${(error as Error).message}`,
          timestamp: Date.now(),
          isLoading: false
        };
      }
    } finally {
      this.isLoading = false;
      // 滚动到底部
      setTimeout(() => {
        this.listScroller.scrollEdge(Edge.Bottom);
      }, 100);
    }
  }

  build() {
    Column() {
      // 顶部标题栏
      Row() {
        Image($r("app.media.app_icon"))
          .width(32)
          .height(32)
          .borderRadius(16)
          .margin({ left: 16 });
        Column() {
          Text("AI 智能助手")
            .fontSize(18)
            .fontWeight(FontWeight.Bold)
            .fontColor("#FFFFFF");
          Text("DeepSeek Chat · 在线")
            .fontSize(12)
            .fontColor("#D6E4F0");
        }
        .margin({ left: 10 });
        Blank();
        Image($r("sys.media.ohos_icon_more"))
          .width(24)
          .height(24)
          .fillColor("#FFFFFF")
          .margin({ right: 16 });
      }
      .width("100%")
      .height(56)
      .backgroundColor("#4472C4")
      .padding({ left: 8, right: 8 });

      // 聊天消息列表
      Scroll(this.listScroller) {
        Column() {
          ForEach(this.messages, (msg: ChatMessage) => {
            if (msg.isLoading) {
              // 加载中的占位消息
              Row() {
                Row() {
                  LoadingProgress()
                    .width(20)
                    .height(20)
                    .margin({ right: 6 });
                  Text("AI 正在思考...")
                    .fontSize(14)
                    .fontColor("#999");
                }
                .padding(12)
                .backgroundColor("#FFFFFF")
                .borderRadius(12);
              }
              .width("100%")
              .justifyContent(FlexAlign.Start)
              .padding({ left: 16, right: 16, top: 8, bottom: 8 });
            } else if (msg.role === Role.USER) {
              // 用户消息 - 右对齐
              Row() {
                Text(msg.content)
                  .fontSize(15)
                  .fontColor("#000000")
                  .padding(12)
                  .backgroundColor("#95EC69")
                  .borderRadius(12);
              }
              .width("100%")
              .justifyContent(FlexAlign.End)
              .padding({ left: 60, right: 16, top: 8, bottom: 8 });
            } else {
              // AI 消息 - 左对齐
              Row() {
                Column() {
                  Row() {
                    Image($r("app.media.app_icon"))
                      .width(28)
                      .height(28)
                      .borderRadius(14);
                    Text("DeepSeek")
                      .fontSize(12)
                      .fontWeight(FontWeight.Bold)
                      .fontColor("#4472C4")
                      .margin({ left: 8 });
                  }
                  .margin({ bottom: 6 });

                  Text(msg.content)
                    .fontSize(15)
                    .fontColor("#333333");
                }
                .padding(12)
                .backgroundColor("#FFFFFF")
                .borderRadius(12);
              }
              .width("100%")
              .justifyContent(FlexAlign.Start)
              .padding({ left: 16, right: 60, top: 8, bottom: 8 });
            }
          }, (msg: ChatMessage) => msg.id);
        }
        .width("100%")
        .padding({ top: 12, bottom: 12 });
      }
      .layoutWeight(1)
      .width("100%")
      .backgroundColor("#F5F5F5");

      // 底部输入区域
      Row() {
        TextInput({ placeholder: "请输入您的问题..." })
          .layoutWeight(1)
          .height(40)
          .fontSize(15)
          .backgroundColor("#F0F0F0")
          .borderRadius(20)
          .padding({ left: 16, right: 16 })
          .onChange((value: string) => {
            this.inputText = value;
          })
          .onSubmit(() => {
            this.onSendMessage();
          });

        Button() {
          Text("发送")
            .fontSize(14)
            .fontColor("#FFFFFF");
        }
        .height(40)
        .width(70)
        .backgroundColor("#4472C4")
        .borderRadius(20)
        .margin({ left: 8 })
        .onClick(() => {
          this.onSendMessage();
        });
      }
      .width("100%")
      .padding({ left: 12, right: 12, top: 8, bottom: 12 })
      .backgroundColor("#FFFFFF");
    }
    .width("100%")
    .height("100%")
    .backgroundColor("#F5F5F5");
  }
}
4. 配置入口页面
更新 EntryAbility.ets,将 ChatPage 设置为首页:
import { UIAbility } from "@kit.AbilityKit";
import { window } from "@kit.ArkUI";

export default class EntryAbility extends UIAbility {
  onWindowStageCreate(windowStage: window.WindowStage): void {
    windowStage.loadContent("pages/ChatPage", (err) => {
      if (err.code) {
        console.error(`加载首页失败: ${JSON.stringify(err)}`);
        return;
      }
      console.info("首页加载成功");
    });
  }
}
5. 完整示例:AI 问答效果
编译运行后,应用启动即进入聊天界面。以下是完整的运行流程:

图2 AI 智能聊天助手界面效果
6. 扩展:实现流式对话
如果需要实现逐字输出的流式对话效果,可以将 stream 参数设为 true,并通过 onDataReceive 回调处理流式数据:
// 流式请求示例
export async function sendChatMessageStream(
  messages: Message[],
  onData: (chunk: string) => void,
  onDone: (fullContent: string) => void,
  onError: (error: Error) => void
): Promise<void> {
  const apiKey = getApiKey();
  const httpRequest = http.createHttp();

  try {
    const requestBody = {
      model: API_MODEL,
      messages: messages,
      temperature: 0.7,
      stream: true   // 启用流式输出
    };

    let fullContent = "";

    httpRequest.on("dataReceive", (data: ArrayBuffer) => {
      const decoder = util.TextDecoder.create("utf-8");
      const chunk = decoder.decodeToString(data);
      // 解析 SSE 格式数据
      const lines = chunk.split("\n");
      for (const line of lines) {
        if (line.startsWith("data: ")) {
          const jsonStr = line.substring(6).trim();
          if (jsonStr === "[DONE]") {
            onDone(fullContent);
            return;
          }
          try {
            const parsed = JSON.parse(jsonStr);
            const delta = parsed.choices?.[0]?.delta?.content || "";
            if (delta) {
              fullContent += delta;
              onData(delta);
            }
          } catch (e) {
            // 忽略解析错误
          }
        }
      }
    });

    httpRequest.on("dataEnd", () => {
      if (fullContent) {
        onDone(fullContent);
      }
    });

    await httpRequest.request(API_BASE_URL, {
      method: http.RequestMethod.POST,
      header: {
        "Content-Type": "application/json",
        "Authorization": `Bearer ${apiKey}`,
        "Accept": "text/event-stream"
      },
      extraData: JSON.stringify(requestBody),
      expectDataType: http.HttpDataType.ARRAY_BUFFER,
      usingCache: false,
      connectTimeout: 30000,
      readTimeout: 120000
    });
  } catch (error) {
    onError(error as Error);
  }
}
运行效果
安装运行后,应用界面如上图所示,具备以下功能:
- 消息发送:在底部输入框输入文本,点击"发送"按钮或按回车键发送消息
- AI 实时回复:发送后显示加载状态,等待 DeepSeek API 返回结果后展示回复内容
- 聊天记录展示:用户消息显示为绿色气泡右对齐,AI 回复显示为白色气泡左对齐并带有头像标识
- 对话历史维护:自动累积上下文消息,支持多轮连续对话
- 异常处理:网络异常或 API 错误时展示友好提示
总结
本章详细介绍了如何在鸿蒙6.0应用中接入 DeepSeek API,实现 AI 智能聊天助手。主要涵盖:
- 通过
@ohos.net.http发起 HTTP 网络请求,与 DeepSeek API 进行交互 - 使用 ArkUI 构建完整的聊天界面,实现消息列表、输入框、发送按钮等组件
- 实现消息管理、状态管理和异常处理等业务逻辑
- 支持流式对话的扩展实现
DeepSeek API 兼容 OpenAI 格式,对接过程标准化,开发者可参考本文方案将 DeepSeek 能力快速应用到鸿蒙应用的各类 AI 场景中,如智能客服、代码助手、内容生成等。

讨论HarmonyOS开发技术,专注于API与组件、DevEco Studio、测试、元服务和应用上架分发等。
更多推荐

 2
2 0
0- 0


 已为社区贡献84条内容

所有评论(0)