鸿蒙ArkTS 递归二叉树分形 · Canvas 动画深度解析 — API 24 实战
项目地址:
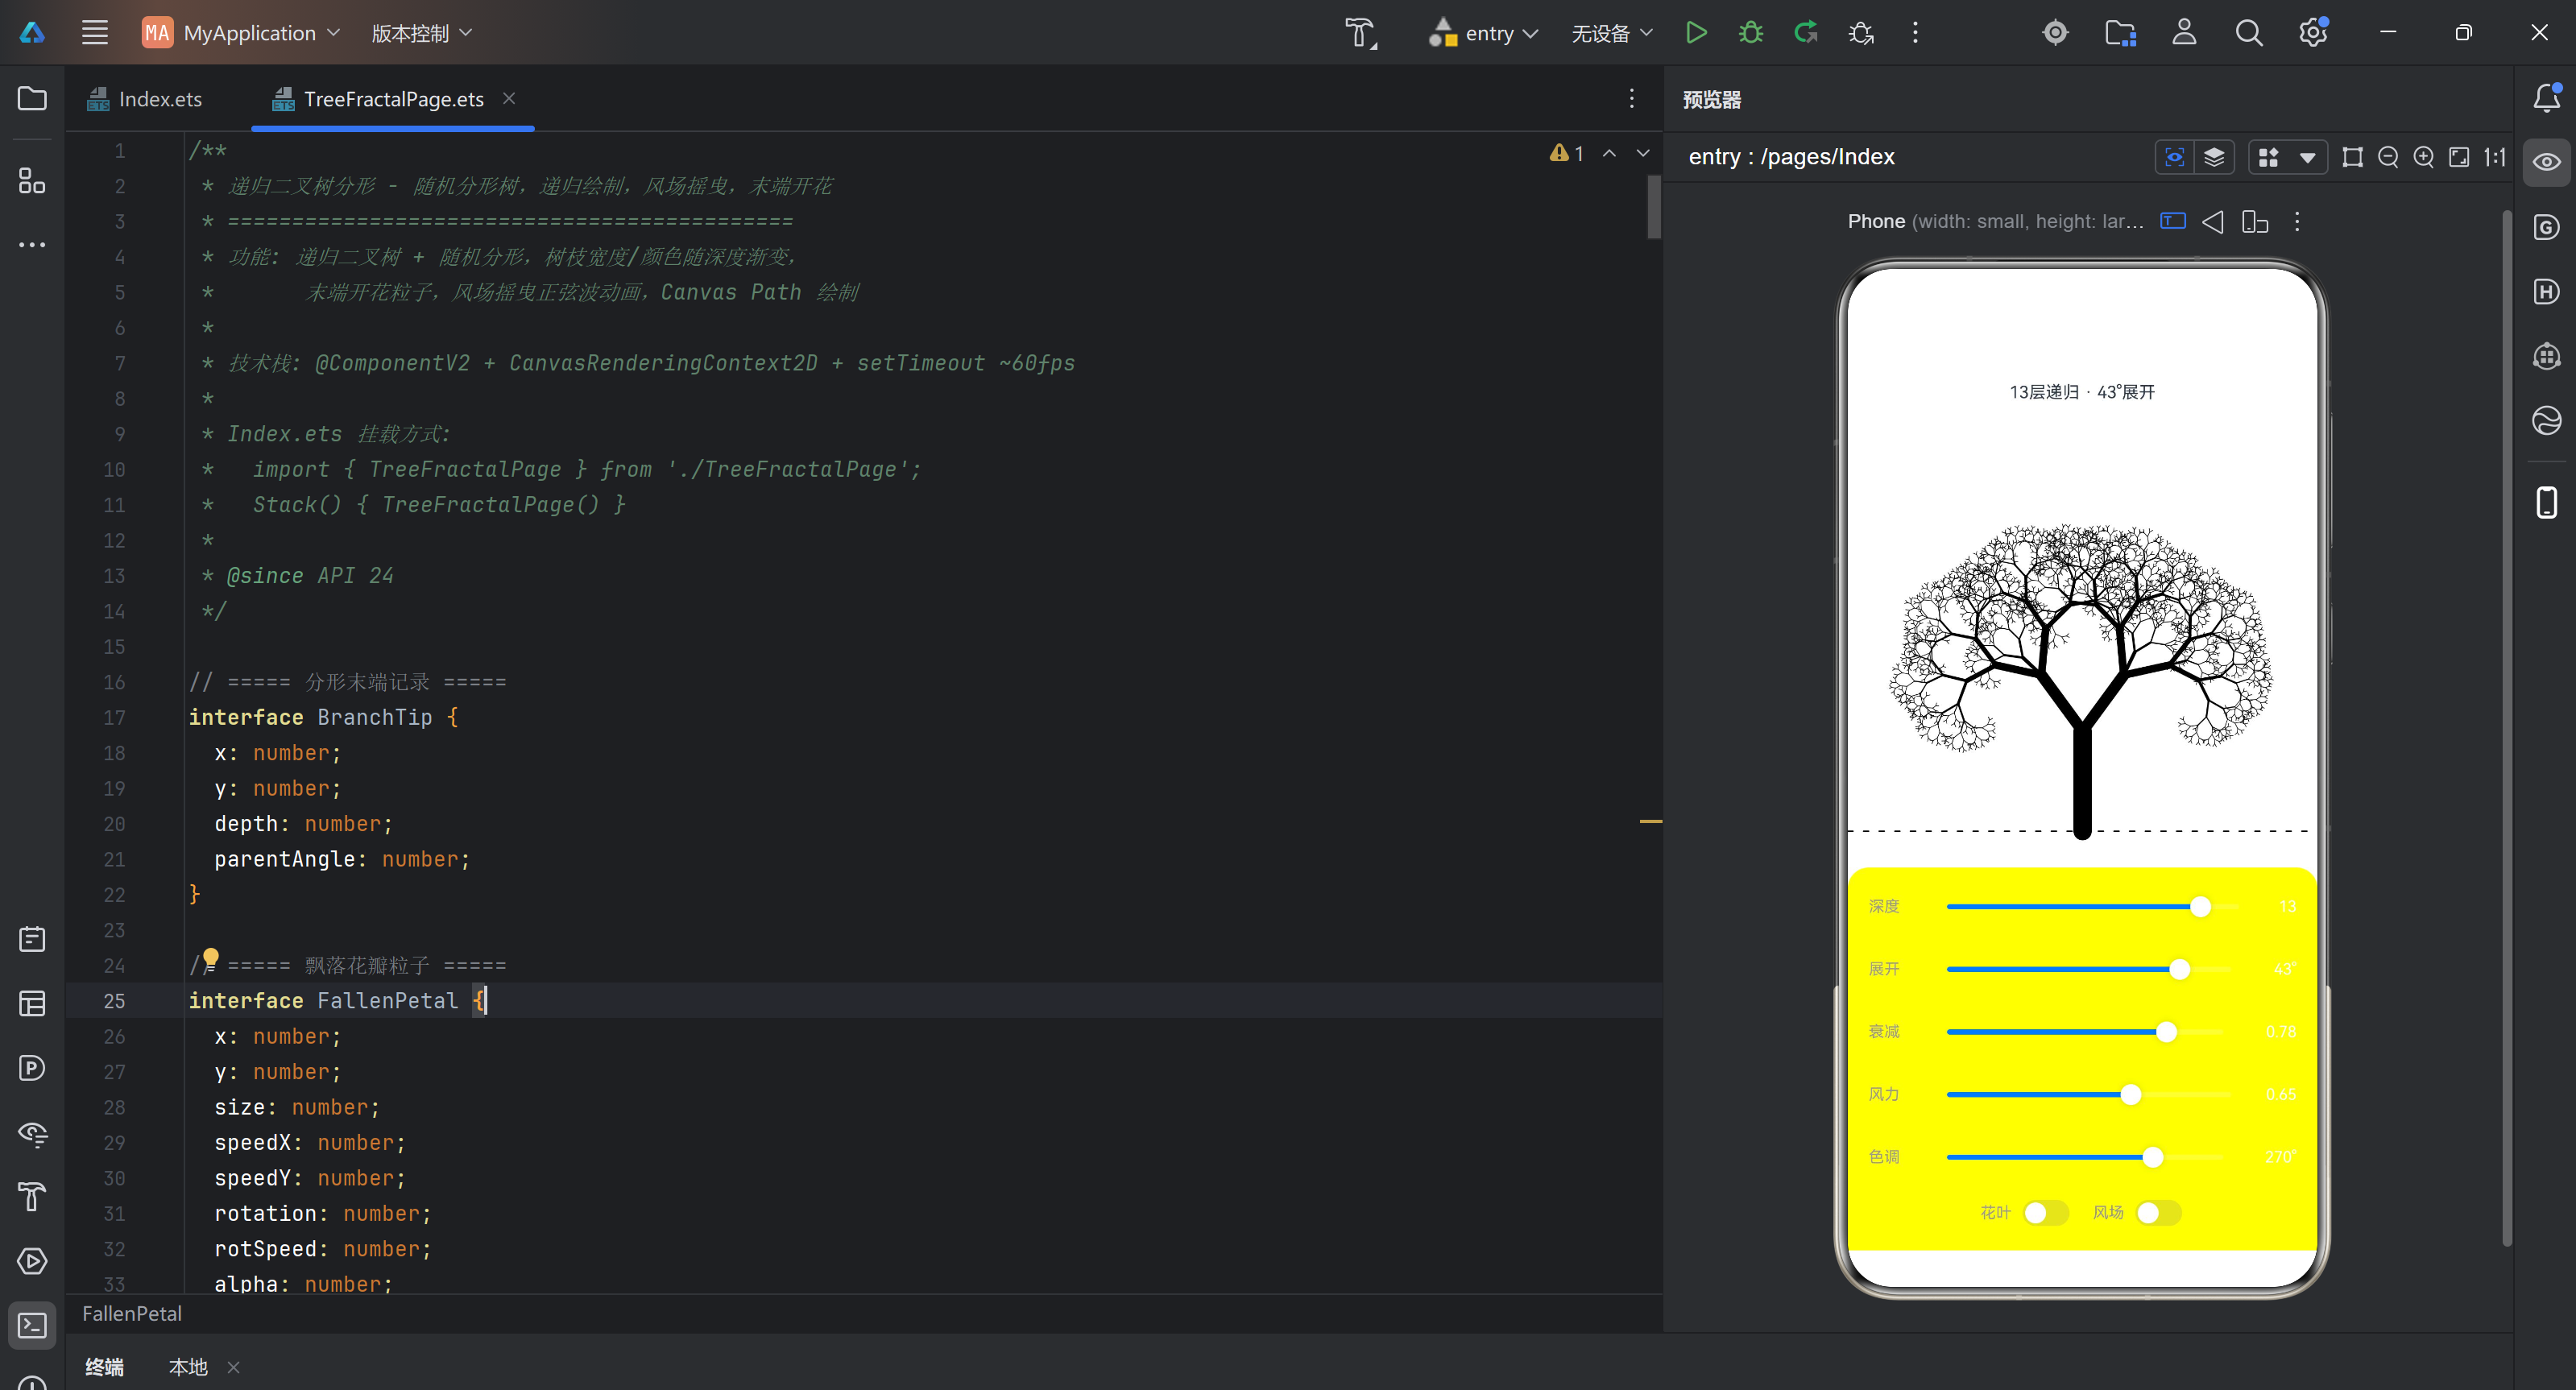
TreeFractalPage.ets— 递归分形树 + 风场摇曳 + 末端开花
一、引言
递归分形树是计算机图形学中最经典也最直观的分形结构之一。它通过一个简单的规则——树干末端分岔为两个子枝——反复迭代,生成出高度自相似的树状结构。这种 L-system(Lindenmayer 系统)的变体在自然界中随处可见:从蕨类植物的叶片到河流的支流网络,再到闪电的路径,都暗含递归分形的规律。
本文从一个实际项目出发,完整展示了在 HarmonyOS Next API 24 环境下,如何使用 @ComponentV2 声明式组件和 CanvasRenderingContext2D 实现一个可交互的递归二叉树分形动画。具体功能包括:
- 递归二叉树生成:6~14 层深度可调,每层二分岔,偶尔三分岔增加自然感
- 宽度/颜色随深度渐变:树干深褐粗壮 → 末端嫩绿纤细,HSL 色相逐步偏移
- 风场摇曳正弦波动画:基于高度 y 和时间 t 的正弦波叠加到每个枝条角度
- 末端开花粒子:每个枝梢绘制 5 瓣花朵 + 多层光晕 + 花蕊脉动
- 飘落花瓣系统:30 个独立粒子带旋转和风力漂移
- 实时交互控制:5 个 Slider + 2 个 Toggle 调节全部参数
本文适合有一定 ArkTS 基础、想在 Canvas 动画方向深入实践的读者。读完你将掌握递归分形的数学建模、确定性伪随机在动画中的运用、HSL 色彩插值、粒子系统设计等核心技能。
二、API 24 特性概览
项目基于 targetSdkVersion: "6.1.1(24)" 构建,使用了以下 API 24 的标志性能力:
2.1 @ComponentV2 与 @Local 装饰器
API 24 引入了 @ComponentV2 作为第二代组件装饰器,相比 @Component 的主要改进包括:
- 显式响应式状态:使用
@Local标记需要驱动 UI 重新渲染的成员变量,而非常量的 getter/setter 代理 - 更轻量的运行时:
@ComponentV2编译后生成的代理代码更少,对性能敏感场景(如 Canvas 动画)更友好 - 更好的 TypeScript 兼容:装饰器语法与标准 TS 更接近,减少特殊语法学习成本
本项目中的核心参数全部使用 @Local 装饰:
@Local recursionDepth: number = 10;
@Local branchAngle: number = 28;
@Local lengthRatio: number = 0.72;
@Local windStrength: number = 0.4;
@Local hueBase: number = 130;
@Local showLeaves: boolean = true;
@Local showWind: boolean = true;
@Local 的最大优势在于:Slider 的 onChang 回调中修改这些变量后,Canvas 不会自动重绘——Canvas 是命令式绘制,不依赖声明式数据绑定驱动的重渲染。这反而给了我们完全控制权:只在 drawTree() 中根据最新值绘制,用 setTimeout 维持稳定的帧率循环。
2.2 CanvasRenderingContext2D
API 24 的 Canvas2D 接口与 W3C 标准高度一致,支持:
| API | 用途 | 本文用法 |
|---|---|---|
createRadialGradient |
径向渐变 | 背景天空 + 花朵光晕 |
arc |
圆弧路径 | 花瓣、花蕊、光晕 |
lineTo / moveTo |
线段路径 | 所有枝条绘制 |
save / restore |
状态栈 | 飘落花瓣的变换隔离 |
translate / rotate / scale |
坐标变换 | 花瓣旋转和拉伸 |
setLineDash |
虚线样式 | 地面参考线 |
clearRect |
清空画布 | 每帧全量重绘 |
2.3 Slider 与 Toggle
API 24 的 Slider 和 Toggle 在视觉上做了 HarmonyOS Design 风格适配,代码中通过 blockColor / selectedColor / trackColor 实现色彩联动——滑块颜色随 hueBase 动态变化,形成统一的视觉主题。
三、完整代码清单
本节给出 TreeFractalPage.ets 和 Index.ets 的完整代码。两个文件加起来约 560 行,覆盖整个应用的全部逻辑。建议先通读一遍,后续各章节将针对关键片段做深入拆解。
3.1 TreeFractalPage.ets — 核心组件
/**
* 递归二叉树分形 - 随机分形树,递归绘制,风场摇曳,末端开花
* ============================================
* 功能: 递归二叉树 + 随机分形,树枝宽度/颜色随深度渐变,
* 末端开花粒子,风场摇曳正弦波动画,Canvas Path 绘制
*
* 技术栈: @ComponentV2 + CanvasRenderingContext2D + setTimeout ~60fps
*
* Index.ets 挂载方式:
* import { TreeFractalPage } from './TreeFractalPage';
* Stack() { TreeFractalPage() }
*
* @since API 24
*/
// ===== 分形末端记录 =====
interface BranchTip {
x: number;
y: number;
depth: number;
parentAngle: number;
}
// ===== 飘落花瓣粒子 =====
interface FallenPetal {
x: number;
y: number;
size: number;
speedX: number;
speedY: number;
rotation: number;
rotSpeed: number;
alpha: number;
hue: number;
}
@ComponentV2
export struct TreeFractalPage {
// ---- Canvas 上下文 ----
private settings: RenderingContextSettings = new RenderingContextSettings(true);
private canvasContext: CanvasRenderingContext2D = new CanvasRenderingContext2D(this.settings);
// ---- 动画状态 ----
@Local time: number = 0;
private animationId: number = 0;
// ---- 可调参数 ----
@Local recursionDepth: number = 10; // 递归深度 6~14
@Local branchAngle: number = 28; // 分支展开角度 10~50°
@Local lengthRatio: number = 0.72; // 每层长度衰减 0.50~0.85
@Local windStrength: number = 0.4; // 风力强度 0~1.0
@Local hueBase: number = 130; // 色相 (绿:120, 秋:30, 粉:320)
@Local showLeaves: boolean = true;
@Local showWind: boolean = true;
// ---- 数据存储 ----
private tips: BranchTip[] = [];
private fallenPetals: FallenPetal[] = [];
// ---- 生命周期 ----
aboutToAppear(): void {
this.initPetals();
this.startAnimation();
}
aboutToDisappear(): void {
this.stopAnimation();
}
// ---- 飘落花瓣初始化 ----
private initPetals(): void {
this.fallenPetals = [];
for (let i = 0; i < 30; i++) {
this.fallenPetals.push(this.createRandomPetal());
}
}
private createRandomPetal(): FallenPetal {
return {
x: Math.random() * 600 - 300,
y: Math.random() * 200 - 100,
size: 2 + Math.random() * 4,
speedX: -0.3 + Math.random() * 0.6,
speedY: 0.2 + Math.random() * 0.5,
rotation: Math.random() * Math.PI * 2,
rotSpeed: -0.03 + Math.random() * 0.06,
alpha: 0.3 + Math.random() * 0.5,
hue: this.hueBase + 30 + Math.random() * 40
};
}
// ---- 动画循环 ----
private startAnimation(): void {
const animate = () => {
this.time += 0.025;
this.drawTree();
this.animationId = setTimeout(animate, 16);
};
animate();
}
private stopAnimation(): void {
if (this.animationId) {
clearTimeout(this.animationId);
this.animationId = 0;
}
}
// ---- 颜色工具 ----
private hsl(h: number, s: number, l: number, a: number): string {
return `hsla(${((h % 360) + 360) % 360},${s}%,${l}%,${a})`;
}
// ---- 确定性伪随机 (树结构每帧一致) ----
private seededRandom(seed: number): number {
const x = Math.sin(seed * 127.1 + 311.7) * 43758.5453123;
return x - Math.floor(x);
}
// ===================== 主绘制 =====================
private drawTree(): void {
const ctx = this.canvasContext;
const w = ctx.width;
const h = ctx.height;
if (w <= 0 || h <= 0) return;
// ---- 清空 + 背景 ----
ctx.clearRect(0, 0, w, h);
const bgGrad = ctx.createRadialGradient(w / 2, h * 0.3, 0, w / 2, h * 0.3, h * 0.8);
bgGrad.addColorStop(0, this.hsl(this.hueBase, 40, 18, 1));
bgGrad.addColorStop(0.5, this.hsl(this.hueBase, 30, 10, 1));
bgGrad.addColorStop(1, this.hsl(this.hueBase, 20, 4, 1));
ctx.fillStyle = bgGrad;
ctx.fillRect(0, 0, w, h);
// ---- 地面参考线 ----
const groundY = h * 0.92;
ctx.strokeStyle = this.hsl(this.hueBase, 20, 15, 0.25);
ctx.lineWidth = 1;
ctx.setLineDash([4, 8]);
ctx.beginPath();
ctx.moveTo(0, groundY);
ctx.lineTo(w, groundY);
ctx.stroke();
ctx.setLineDash([]);
// ---- 重置末端列表 ----
this.tips = [];
// ---- 树干参数 ----
const trunkLength = h * 0.22;
const startX = w / 2;
const startY = groundY;
const baseWidth = 14;
// ---- 递归绘制分形树 ----
this.drawBranch(ctx, startX, startY, trunkLength, -Math.PI / 2, 0, this.recursionDepth, baseWidth);
// ---- 在末端绘制花朵/粒子 ----
if (this.showLeaves) {
for (const tip of this.tips) {
this.drawFlower(ctx, tip.x, tip.y, tip.depth, tip.parentAngle);
}
}
// ---- 飘落花瓣 ----
this.drawFallenPetals(ctx, w, h);
}
// ---- 递归绘制枝条 ----
private drawBranch(
ctx: CanvasRenderingContext2D,
x: number, y: number,
length: number, angle: number,
depth: number, maxDepth: number,
width: number
): void {
// 终止条件
if (depth > maxDepth || length < 2 || width < 0.3) {
this.tips.push({ x, y, depth, parentAngle: angle });
return;
}
const depthRatio = depth / maxDepth;
// ---- 风场偏移 (正弦波随高度变化) ----
let windAngle = 0;
if (this.showWind) {
const windOffset = this.windStrength * 0.1 * Math.sin(this.time * 1.2 + y * 0.015);
windAngle = windOffset;
}
const finalAngle = angle + windAngle;
const endX = x + Math.cos(finalAngle) * length;
const endY = y + Math.sin(finalAngle) * length;
// ---- 颜色: 树干棕 → 枝叶绿/彩色 ----
const hue = this.hueBase - 30 + depthRatio * 50;
const lightness = 18 + depthRatio * 35;
const alpha = 0.7 + 0.3 * (1 - depthRatio);
// ---- 宽度随深度递减 ----
const drawWidth = Math.max(width * (1 - depthRatio * 0.55), 0.5);
// ---- Canvas Path 绘制枝条 ----
ctx.beginPath();
ctx.moveTo(x, y);
ctx.lineTo(endX, endY);
ctx.strokeStyle = this.hsl(hue, 55 + depthRatio * 20, lightness, alpha);
ctx.lineWidth = drawWidth;
ctx.lineCap = 'round' ;
ctx.stroke();
// ---- 分岔: 确定性伪随机 (保证树形每帧稳定) ----
const seedBase = depth * 1000 + x * 0.5 + y * 0.3;
const rand1 = this.seededRandom(seedBase);
const rand2 = this.seededRandom(seedBase + 100);
const rand3 = this.seededRandom(seedBase + 200);
const spreadAngle = this.branchAngle * (0.75 + 0.25 * rand1);
const shrinkFactor = this.lengthRatio * (0.85 + 0.15 * rand2);
const widthShrink = 0.6 + 0.1 * rand3;
const nextLength = length * shrinkFactor;
const nextWidth = Math.max(width * widthShrink, 0.3);
// 左分支
this.drawBranch(ctx, endX, endY, nextLength, finalAngle - spreadAngle * Math.PI / 180,
depth + 1, maxDepth, nextWidth);
// 右分支
this.drawBranch(ctx, endX, endY, nextLength, finalAngle + spreadAngle * Math.PI / 180,
depth + 1, maxDepth, nextWidth);
// 偶尔额外分支 (增加自然感)
if (depth < maxDepth - 3 && rand3 > 0.6) {
const midLen = nextLength * 0.55;
const midW = nextWidth * 0.5;
const midAngleOffset = (rand2 - 0.5) * spreadAngle * 0.6 * Math.PI / 180;
this.drawBranch(ctx, endX, endY, midLen, finalAngle + midAngleOffset,
depth + 2, maxDepth, midW);
}
}
// ---- 末端开花 ----
private drawFlower(ctx: CanvasRenderingContext2D, x: number, y: number, depth: number, angle: number): void {
const depthRatio = depth / this.recursionDepth;
const size = 2.5 + depthRatio * 5;
// 花朵基部色相: 偏向粉/红/黄系
const hue = this.hueBase + 50 + depthRatio * 30 + Math.sin(depth * 2.5) * 15;
// ---- 外层光晕 (多层径向渐变) ----
for (let r = 0; r < 3; r++) {
const glowR = size * (1.5 + r * 1.2);
const grad = ctx.createRadialGradient(x, y, 0, x, y, glowR);
grad.addColorStop(0, this.hsl(hue + r * 25, 90, 80, 0.5 - r * 0.12));
grad.addColorStop(0.5, this.hsl(hue + r * 25, 80, 60, 0.2 - r * 0.06));
grad.addColorStop(1, this.hsl(hue + r * 25, 70, 40, 0));
ctx.fillStyle = grad;
ctx.beginPath();
ctx.arc(x, y, glowR, 0, Math.PI * 2);
ctx.fill();
}
// ---- 5 片花瓣 (使用偏移圆模拟) ----
const petalCount = 5;
for (let i = 0; i < petalCount; i++) {
const pAngle = angle + (i / petalCount) * Math.PI * 2 + this.time * 0.08;
const petalR = size * 1.0;
const px = x + Math.cos(pAngle) * petalR;
const py = y + Math.sin(pAngle) * petalR;
ctx.beginPath();
ctx.arc(px, py, size * 0.45, 0, Math.PI * 2);
ctx.fillStyle = this.hsl(hue + i * 12, 85, 65 + Math.sin(this.time + i) * 8, 0.65);
ctx.fill();
}
// ---- 花蕊 (中心亮点) ----
const stamenSize = size * 0.3 + 1 * Math.sin(this.time * 2 + depth);
ctx.beginPath();
ctx.arc(x, y, stamenSize, 0, Math.PI * 2);
ctx.fillStyle = this.hsl(50, 95, 88, 0.9);
ctx.fill();
// ---- 花蕊外圈细点 ----
for (let i = 0; i < 6; i++) {
const sa = this.time * 0.5 + i * Math.PI / 3;
const sx = x + Math.cos(sa) * stamenSize * 1.5;
const sy = y + Math.sin(sa) * stamenSize * 1.5;
ctx.beginPath();
ctx.arc(sx, sy, 1, 0, Math.PI * 2);
ctx.fillStyle = this.hsl(40 + i * 10, 90, 80, 0.6);
ctx.fill();
}
}
// ---- 飘落花瓣 (独立粒子系统) ----
private drawFallenPetals(ctx: CanvasRenderingContext2D, w: number, h: number): void {
if (!this.showLeaves || !this.showWind) return;
const groundY = h * 0.92;
const cx = w / 2;
for (let i = 0; i < this.fallenPetals.length; i++) {
const p = this.fallenPetals[i];
// 更新位置 (相对树干中心漂移)
const windDrift = this.windStrength * 0.3 * Math.sin(this.time * 0.8 + i * 0.5);
p.x += p.speedX + windDrift;
p.y += p.speedY;
p.rotation += p.rotSpeed;
// 边界循环
const absX = cx + p.x;
const absY = groundY - 20 + p.y;
// 超出画布则重置
if (p.y > 300 || absX < -50 || absX > w + 50) {
this.fallenPetals[i] = this.createRandomPetal();
this.fallenPetals[i].y = -100;
this.fallenPetals[i].x = (Math.random() - 0.5) * w * 0.8;
continue;
}
const drawX = cx + p.x;
const drawY = groundY - 20 + p.y;
// 花瓣旋转效果: 画椭圆或旋转的圆
ctx.save();
ctx.translate(drawX, drawY);
ctx.rotate(p.rotation);
// 花瓣形状 (拉伸的椭圆)
ctx.beginPath();
ctx.arc(0, 0, p.size * 0.4, 0, Math.PI * 2);
ctx.scale(1.8, 1);
ctx.beginPath();
ctx.arc(0, 0, p.size * 0.4, 0, Math.PI * 2);
ctx.fillStyle = this.hsl(p.hue, 80, 65, p.alpha * (0.5 + 0.5 * Math.sin(this.time + i)));
ctx.fill();
ctx.restore();
}
}
// ===================== UI 构建 =====================
build() {
Column({ space: 0 }) {
// ---- 标题 ----
Text('分形灵树')
.fontSize(24)
.fontWeight(FontWeight.Bold)
.fontColor('#FFFFFF')
.width('100%')
.textAlign(TextAlign.Center)
.padding({ top: 16, bottom: 4 })
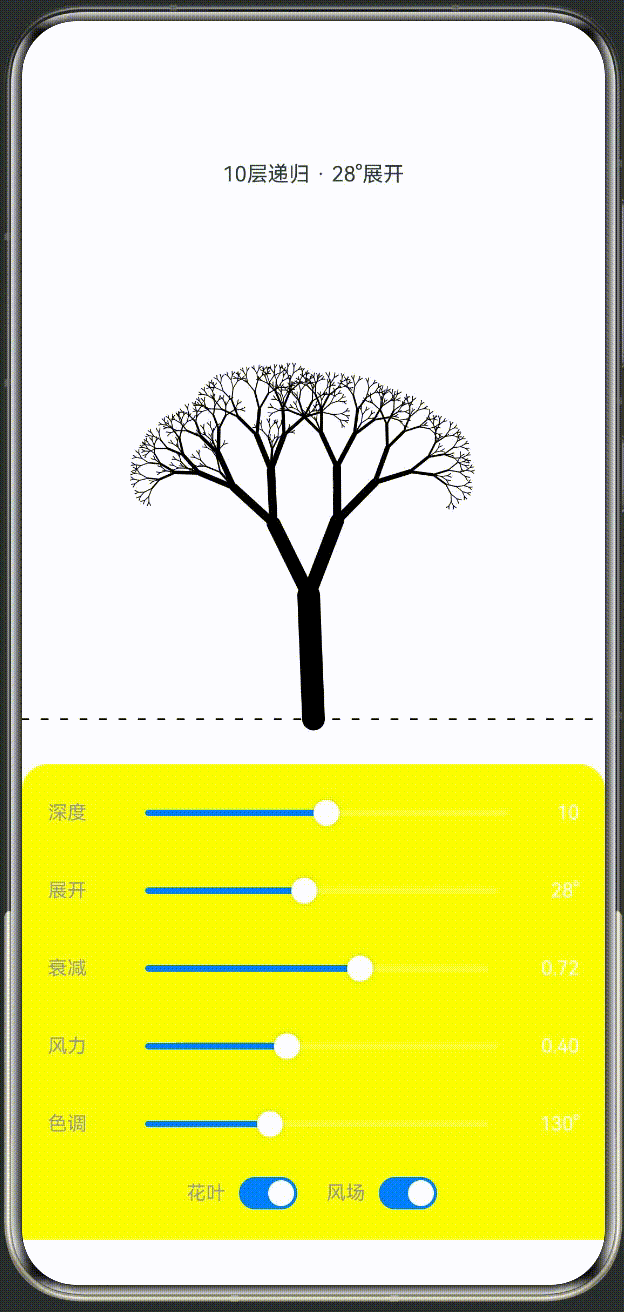
Text(`${this.recursionDepth}层递归 · ${this.branchAngle}°展开`)
.fontSize(13)
.fontColor(this.hsl(this.hueBase, 70, 70, 1))
.width('100%')
.textAlign(TextAlign.Center)
.padding({ bottom: 8 })
// ---- Canvas 画布 ----
Canvas(this.canvasContext)
.width('100%')
.layoutWeight(1)
// ---- 控制面板 ----
Column({ space: 8 }) {
// 行1: 递归深度
Row({ space: 10 }) {
Text('深度')
.fontSize(12)
.fontColor('#999999')
.width(40)
Slider({
value: this.recursionDepth,
min: 6, max: 14, step: 1
})
.layoutWeight(1)
.trackThickness(4)
.blockColor(this.hsl(this.hueBase, 70, 65, 1))
.trackColor('#FFFFFF30')
.selectedColor(this.hsl(this.hueBase, 70, 65, 1))
.onChange((val: number) => { this.recursionDepth = val; })
Text(`${this.recursionDepth}`)
.fontSize(12)
.fontColor('#FFFFFF')
.width(24)
.textAlign(TextAlign.End)
}
.width('100%')
// 行2: 分支角度
Row({ space: 10 }) {
Text('展开')
.fontSize(12)
.fontColor('#999999')
.width(40)
Slider({
value: this.branchAngle,
min: 10, max: 50, step: 1
})
.layoutWeight(1)
.trackThickness(4)
.blockColor(this.hsl(this.hueBase, 70, 65, 1))
.trackColor('#FFFFFF30')
.selectedColor(this.hsl(this.hueBase, 70, 65, 1))
.onChange((val: number) => { this.branchAngle = val; })
Text(`${this.branchAngle}°`)
.fontSize(12)
.fontColor('#FFFFFF')
.width(30)
.textAlign(TextAlign.End)
}
.width('100%')
// 行3: 长度衰减
Row({ space: 10 }) {
Text('衰减')
.fontSize(12)
.fontColor('#999999')
.width(40)
Slider({
value: this.lengthRatio,
min: 0.5, max: 0.85, step: 0.01
})
.layoutWeight(1)
.trackThickness(4)
.blockColor(this.hsl(this.hueBase, 70, 65, 1))
.trackColor('#FFFFFF30')
.selectedColor(this.hsl(this.hueBase, 70, 65, 1))
.onChange((val: number) => { this.lengthRatio = val; })
Text(`${this.lengthRatio.toFixed(2)}`)
.fontSize(12)
.fontColor('#FFFFFF')
.width(36)
.textAlign(TextAlign.End)
}
.width('100%')
// 行4: 风力
Row({ space: 10 }) {
Text('风力')
.fontSize(12)
.fontColor('#999999')
.width(40)
Slider({
value: this.windStrength,
min: 0, max: 1.0, step: 0.05
})
.layoutWeight(1)
.trackThickness(4)
.blockColor(this.hsl(this.hueBase, 70, 65, 1))
.trackColor('#FFFFFF30')
.selectedColor(this.hsl(this.hueBase, 70, 65, 1))
.onChange((val: number) => { this.windStrength = val; })
Text(`${this.windStrength.toFixed(2)}`)
.fontSize(12)
.fontColor('#FFFFFF')
.width(30)
.textAlign(TextAlign.End)
}
.width('100%')
// 行5: 色相
Row({ space: 10 }) {
Text('色调')
.fontSize(12)
.fontColor('#999999')
.width(40)
Slider({
value: this.hueBase,
min: 0, max: 360, step: 5
})
.layoutWeight(1)
.trackThickness(4)
.blockColor(this.hsl(this.hueBase, 70, 65, 1))
.trackColor('#FFFFFF30')
.selectedColor(this.hsl(this.hueBase, 70, 65, 1))
.onChange((val: number) => { this.hueBase = val; })
Text(`${this.hueBase}°`)
.fontSize(12)
.fontColor('#FFFFFF')
.width(36)
.textAlign(TextAlign.End)
}
.width('100%')
// 行6: 开关
Row({ space: 16 }) {
Row({ space: 6 }) {
Text('花叶')
.fontSize(12)
.fontColor('#999999')
Toggle({ type: ToggleType.Switch, isOn: this.showLeaves })
.selectedColor(this.hsl(this.hueBase, 70, 65, 1))
.switchPointColor('#FFFFFF')
.onChange((isOn: boolean) => { this.showLeaves = isOn; })
}
Row({ space: 6 }) {
Text('风场')
.fontSize(12)
.fontColor('#999999')
Toggle({ type: ToggleType.Switch, isOn: this.showWind })
.selectedColor(this.hsl(this.hueBase, 70, 65, 1))
.switchPointColor('#FFFFFF')
.onChange((isOn: boolean) => { this.showWind = isOn; })
}
}
.width('100%')
.justifyContent(FlexAlign.Center)
}
.width('100%')
.padding({ left: 16, right: 16, top: 10, bottom: 14 })
.backgroundColor('#FFFFFF10')
.borderRadius({ topLeft: 16, topRight: 16 })
}
.width('100%')
.height('100%')
.backgroundColor(this.hsl(this.hueBase, 30, 4, 1))
}
}
3.2 Index.ets — 挂载入口
/**
 * 应用主入口
 * 仅做页面挂载,代码逻辑在各独立文件中
 */

// 切换注释即可换页:
import { TreeFractalPage } from './TreeFractalPage';
// import { KaleidoscopePage } from './KaleidoscopePage';

@Entry
@ComponentV2
struct Index {
  build(): void {
    Stack() {
      TreeFractalPage()
      // KaleidoscopePage()
    }
    .width('100%')
    .height('100%')
  }
}
Index.ets 的职责极其简单——仅做路由挂载。将不同页面的切换简化为一行 import 注释的切换,适合多应用 Demo 的项目结构。
四、架构设计精析
4.1 组件化层级
整个页面采用单组件直出模式:Index → TreeFractalPage。TreeFractalPage 内部没有嵌套子组件,因为 Canvas 动画的所有绘制操作都在同一上下文中完成。这种扁平结构避免了组件树深度对 60fps 渲染的干扰。
组件内部的职责划分:
TreeFractalPage
├── 状态层 (@Local)
│   ├── time          — 动画时间 (驱动所有动态行为)
│   ├── recursionDepth — 递归深度
│   ├── branchAngle    — 分支角度
│   ├── lengthRatio    — 长度衰减率
│   ├── windStrength   — 风强度
│   ├── hueBase        — 基色相
│   ├── showLeaves     — 显示花叶
│   └── showWind       — 显示风场
├── 数据层 (private)
│   ├── tips[]         — 枝梢位置列表 (每帧重建)
│   └── fallenPetals[] — 飘落花瓣粒子 (持久)
├── 绘制层
│   ├── drawTree()     — 主绘制入口
│   ├── drawBranch()   — 递归枝条绘制
│   ├── drawFlower()   — 末端开花
│   └── drawFallenPetals() — 飘落花瓣
├── 动画层
│   ├── startAnimation()  — setTimeout 驱动
│   └── stopAnimation()   — clearTimeout 清理
└── 视图层 (build)
    ├── 标题区域
    ├── Canvas 画布
    └── 控制面板 (5×Slider + 2×Toggle)
4.2 生命周期管理
与万花筒类似,生命周期管理是 Canvas 动画的关键:
aboutToAppear(): void {
  this.initPetals();    // 1. 初始化粒子
  this.startAnimation(); // 2. 启动动画
}

aboutToDisappear(): void {
  this.stopAnimation();  // 清理定时器
}
两个要点:
- aboutToAppear 在组件首次创建时调用,此时 Canvas 上下文已经可用,可以安全地启动绘制循环
- aboutToDisappear 在组件被销毁时调用,必须清理
setTimeout句柄,否则组件已销毁但定时器仍在执行,会导致不可预测的错误
4.3 渲染管道
每帧的渲染流程是线性的:
startAnimation → time += 0.025
                    ↓
               drawTree()
                    ↓
          1. clearRect 清空画布
          2. 绘制背景径向渐变
          3. 绘制地面虚线
          4. tips = [] 重置
          5. drawBranch(树干) ← 递归展开
               ├── 风场偏移计算
               ├── lineTo 绘制枝条
               └── 递归左/右/中分支
          6. 遍历 tips[] → drawFlower 每朵
          7. drawFallenPetals 粒子系统
                    ↓
           setTimeout(animate, 16) → 下一帧
这种每帧全量重绘的模式是 Canvas 动画的标配。虽然看起来"每次都在重复工作",但 Canvas 本身是无状态位图缓冲区,只有重绘才能实现动态效果。现代 GPU 硬件加速下,绘制几百条线段和几十个圆形开销极小,完全能维持 60fps。
五、递归二叉树的数学原理
5.1 分形树的定义
一棵递归二叉树可以用如下规则定义:
初始状态:有一个树干,从底部 (cx, groundY) 向上生长到 (cx, groundY - trunkLength)
递归规则:对于每个枝条,在其末端分岔为两个子枝:
- 左枝:角度 = 父角度 - 展开角 × 随机因子
- 右枝:角度 = 父角度 + 展开角 × 随机因子
- 长度 = 父长度 × 衰减率 × 随机因子
终止条件:当递归深度超过最大深度,或长度/宽度小于阈值时停止。
这个规则可以数学表达为:
B₀ = (startPos, -π/2, trunkLength, baseWidth)  // 初始枝

B(d+1) = B(d) 的末端分岔:
  left_child(B)  = ( end(B), angle(B) - θ₁, len(B) × r₁, w(B) × r₂ )
  right_child(B) = ( end(B), angle(B) + θ₁, len(B) × r₁, w(B) × r₂ )
其中 θ₁ = branchAngle × (0.75 + 0.25 × rand₁),r₁ = lengthRatio × (0.85 + 0.15 × rand₂),r₂ = 0.6 + 0.1 × rand₃,每个 rand 值由 seededRandom 从 depth+坐标计算的种子生成。
5.2 端点计算
给定起点 (x, y)、长度 length 和角度 angle,终点坐标由三角函数确定:
const endX = x + Math.cos(angle) * length;
const endY = y + Math.sin(angle) * length;
角度单位为弧度。垂直向上为 -π/2(因为 Canvas Y 轴向下为正)。每次递归时,左右分支的角度在父角度基础上分别加减 spreadAngle。
5.3 递归终止条件的三重保护
if (depth > maxDepth || length < 2 || width < 0.3) {
  this.tips.push({ x, y, depth, parentAngle: angle });
  return;
}
- depth > maxDepth:主条件,用户设定的递归层级
- length < 2:当枝条缩短到 2px 以下时停止(物理极限,再短也看不见了)
- width < 0.3:当宽度收缩到 0.3px 以下时停止(渲染无意义)
5.4 分形复杂度分析
递归二叉树的枝条总数是 O(2^depth) 量级:
| 深度 | 枝条数约 | 视觉效果 |
|---|---|---|
| 6 | 2^6 = 64 | 稀疏,每枝清晰可见 |
| 8 | 256 | 适中,有层次感 |
| 10 | 1024 | 丰富,产生树冠效果 |
| 12 | 4096 | 密集,接近真实树形 |
| 14 | 16384 | 极密,可能影响帧率 |
实际上由于每条枝在末端可能触发额外分支(三分岔),实际数量比理论值多约 5~10%。在 14 层深度下,单帧需要绘制约 1.7 万条线段,这正好是 Canvas 性能的分水岭——超过 2 万条线段时可能掉帧。
六、随机分形机制
6.1 为什么需要随机性?
严格对称的二叉树看起来像计算机生成的线路图,缺乏自然感。真实树木的枝条并非完全对称,每一对分支的角度和长度都有微小的随机差异。引入随机性后,树形会呈现出"有机感"——有的枝长一些,有的分叉宽一些。
6.2 确定性伪随机 (seededRandom)
但这里有一个关键问题:如果每帧都使用 Math.random(),树形会在每帧剧烈抖动,因为随机值不断变化。解决方案是使用确定性伪随机函数——给定相同的种子,返回相同的"随机"值。
private seededRandom(seed: number): number {
  const x = Math.sin(seed * 127.1 + 311.7) * 43758.5453123;
  return x - Math.floor(x);
}
这个函数的原理:
- 输入一个种子数(seed)
- 通过线性变换
seed * 127.1 + 311.7将种子分散到相位空间 Math.sin()的输出在 [-1, 1] 之间振荡,乘以大质数 43758.5453123 后的小数部分呈现出均匀的伪随机分布x - Math.floor(x)取小数部分,结果落在 [0, 1)
种子由 depth 和坐标共同决定:
const seedBase = depth * 1000 + x * 0.5 + y * 0.3;
这样只要树的结构不变(depth/x/y 不变),随机值就不变,树形稳定。而风场动画是叠加在角度上的正弦波,不影响种子计算。
6.3 三个随机维度的应用
const rand1 = this.seededRandom(seedBase);
const rand2 = this.seededRandom(seedBase + 100);
const rand3 = this.seededRandom(seedBase + 200);
| 随机变量 | 影响对象 | 范围 | 效果 |
|---|---|---|---|
| rand1 | spreadAngle | branchAngle × (0.75~1.00) | 分岔角不一致 |
| rand2 | shrinkFactor | lengthRatio × (0.85~1.00) | 一枝条偏长,另一偏短 |
| rand3 | widthShrink + 额外分支 | 0.6~0.7 × 宽度 | 粗细不一 + 偶尔三分岔 |
三个随机值使用不同的种子偏移(+0, +100, +200),确保它们在统计上彼此独立。
6.4 三分岔的时机
为了进一步增加自然感,代码在深度小于 maxDepth - 3 且 rand3 > 0.6(约 40% 概率)时,会生成一个中间分支:
if (depth < maxDepth - 3 && rand3 > 0.6) {
  const midLen = nextLength * 0.55;
  const midW = nextWidth * 0.5;
  const midAngleOffset = (rand2 - 0.5) * spreadAngle * 0.6 * Math.PI / 180;
  this.drawBranch(ctx, endX, endY, midLen, finalAngle + midAngleOffset,
    depth + 2, maxDepth, midW);
}
这个额外分支的方向在左右之间随机偏移,长度为主枝的 55%,宽度为主枝的 50%。它在末端 2 层后分岔(depth + 2),因此不会破坏整体的递归结构。
七、宽度与颜色渐变系统
7.1 depthRatio — 归一化深度
深度比率 depthRatio = depth / maxDepth 是渐变系统的核心控制变量:
- depth = 0 时,depthRatio = 0(树干)
- depth = maxDepth 时,depthRatio = 1(末端)
所有渐变参数都以 depthRatio 为自变量进行线性或非线性插值。
7.2 宽度衰减
const drawWidth = Math.max(width * (1 - depthRatio * 0.55), 0.5);
树干基宽度 baseWidth = 14px,每递归一层,宽度乘以 widthShrink = 0.6 + 0.1 * rand3(约 0.6~0.7 倍),并额外应用 depthRatio 的全局衰减系数 (1 - depthRatio * 0.55)。
这个全局系数确保从树干到末端的宽度平滑递减,而不会因为随机收缩因子产生"树干上的某个枝突然变细"的不自然感。
7.3 HSL 色彩插值
颜色渐变使用 HSL 色彩空间的三分量插值:
// 色相: 树干偏棕(hue-30) → 枝叶偏绿/彩色(hue+20)
const hue = this.hueBase - 30 + depthRatio * 50;

// 明度: 树干暗(18%) → 枝叶亮(53%)
const lightness = 18 + depthRatio * 35;

// 饱和度: 树干稍低(55%) → 枝叶鲜艳(75%)
// 在 lineWidth 调用处: 55 + depthRatio * 20

// 透明度: 树干近处(1.0) → 枝叶稍淡(0.7)
// 在 lineWidth 调用处: 0.7 + 0.3 * (1 - depthRatio)
色彩渐变路线示意(hueBase = 120 绿色主题):
| 深度 | depthRatio | 色相 | 明度 | 饱和度 | 视觉效果 |
|---|---|---|---|---|---|
| 0 (树干) | 0.0 | 90 (黄绿) | 18% | 55% | 深褐绿色树干 |
| 3 | 0.3 | 105 | 28% | 61% | 转绿 |
| 6 | 0.6 | 120 (纯绿) | 39% | 67% | 健康绿叶 |
| 10 | 1.0 | 140 (青绿) | 53% | 75% | 嫩绿新芽 |
当 hueBase 设为 30(秋色)时,渐变路线变为:
| depthRatio | 色相 | 视觉效果 |
|---|---|---|
| 0.0 | 0 (红棕) | 深秋树干 |
| 0.5 | 55 (黄) | 金黄色枝叶 |
| 1.0 | 80 (黄绿) | 枯黄末梢 |
HSL 相比于 RGB 的优势在此凸显——只需调整 H 和 L 两个分量,就能产生自然且和谐的渐变色带。
八、末端开花粒子
8.1 花朵的结构
每朵花由三个层次组成:
- 外层光晕:3 层半径递增的径向渐变圆,从半透明渐变到全透明
- 5 片花瓣:均匀分布在 360° 上,每片是一个偏移的小圆
- 花蕊:中心脉动的亮圆点 + 6 个围绕的蕊丝细点
8.2 光晕绘制
for (let r = 0; r < 3; r++) {
  const glowR = size * (1.5 + r * 1.2);
  const grad = ctx.createRadialGradient(x, y, 0, x, y, glowR);
  grad.addColorStop(0, this.hsl(hue + r * 25, 90, 80, 0.5 - r * 0.12));
  grad.addColorStop(0.5, this.hsl(hue + r * 25, 80, 60, 0.2 - r * 0.06));
  grad.addColorStop(1, this.hsl(hue + r * 25, 70, 40, 0));
  ctx.fillStyle = grad;
  ctx.beginPath();
  ctx.arc(x, y, glowR, 0, Math.PI * 2);
  ctx.fill();
}
三层光晕的参数关系:
| 层数 r | 半径倍率 | 中心透明度 | 边缘透明度 |
|---|---|---|---|
| 0 | 1.5x | 0.50 | 0 |
| 1 | 2.7x | 0.38 | 0 |
| 2 | 3.9x | 0.26 | 0 |
每层色相偏移 +25°,产生从中心到外围的色散效果——类似真实花朵中花瓣基部和尖端的颜色差异。
8.3 花瓣布局
花瓣使用"偏移圆"技术:不画复杂的贝塞尔曲线花瓣形状,而是画 5 个小圆均匀分布在枝梢周围的圆周上:
const petalCount = 5;
for (let i = 0; i < petalCount; i++) {
  const pAngle = angle + (i / petalCount) * Math.PI * 2 + this.time * 0.08;
  const petalR = size * 1.0;
  const px = x + Math.cos(pAngle) * petalR;
  const py = y + Math.sin(pAngle) * petalR;
  ctx.beginPath();
  ctx.arc(px, py, size * 0.45, 0, Math.PI * 2);
  ctx.fillStyle = this.hsl(hue + i * 12, 85, 65 + Math.sin(this.time + i) * 8, 0.65);
  ctx.fill();
}
花瓣的明度随时间正弦脉动 Math.sin(this.time + i) * 8,每片花的脉动相位不同,形成此起彼伏的"呼吸"效果。this.time * 0.08 让整朵花缓慢旋转。
8.4 花朵大小与深度关系
const size = 2.5 + depthRatio * 5;
const hue = this.hueBase + 50 + depthRatio * 30 + Math.sin(depth * 2.5) * 15;
末端越深(越接近树冠外层),花朵越大、色相偏移越多。Math.sin(depth * 2.5) * 15 为不同深度的花增加 15° 的色相波动,使树冠呈现色彩渐变带而非单一色调。
8.5 花蕊
花蕊有两个部分:
- 中心亮点:半径
size * 0.3 + Math.sin(this.time * 2 + depth),用固定黄色高亮 (hsl 50/95/88) - 蕊丝细点:6 个细小圆点以 60° 间隔围绕中心,颜色渐变
hsl(40 + i*10, 90, 80)
蕊丝围绕中心缓慢旋转 this.time * 0.5,为静态花朵增加微妙的动态细节。
九、风场摇曳动画
9.1 正弦波叠加原理
风场效果的核心公式:
const windOffset = this.windStrength * 0.1 * Math.sin(this.time * 1.2 + y * 0.015);
windAngle = windOffset;
解释:
this.time * 1.2:时间维度的正弦振荡,频率 1.2 rad/帧 ≈ 19 个完整周期/秒y * 0.015:空间维度的相位偏移,高度越高(y 值越小),相位偏移的累积量不同this.windStrength * 0.1:幅度控制,最大偏移约 0.1 rad ≈ 5.7°
9.2 为什么风对树梢影响更大?
这个公式巧妙之处在于 y * 0.015 一项。树梢的 y 值更小(更靠近画布顶部),y * 0.015 的值也较小,导致树梢的相位与树干不同。同时因为树梢的枝条更细更长,同样角度的偏移在树梢末端产生的空间位移更大。
真实物理中,风对树梢的影响确实大于树干——树干粗壮抗弯刚度大,而细枝容易随风摆动。看似简单的正弦公式,在视觉上很好地模拟了这种物理差异。
9.3 飘落花瓣的风力漂移
飘落花瓣受风的影响更大:
const windDrift = this.windStrength * 0.3 * Math.sin(this.time * 0.8 + i * 0.5);
p.x += p.speedX + windDrift;
这里的风力系数 0.3 是枝条的 3 倍,且频率 0.8 更慢,产生更柔和的漂移轨迹。i * 0.5 为每个花瓣分配不同相位,使它们不会同时朝同一方向飘动。
9.4 风场关断的完整回退
当用户关闭风场(showWind = false)时:
drawBranch中的windAngle保持为 0,枝条按静态角度绘制drawFallenPetals直接 return,飘落花瓣完全不绘制- 但花瓣的
speedX/speedY仍在累加——下次打开风场时,花瓣已经移动到了新的位置
十、飘落花瓣粒子系统
10.1 粒子属性
每个 FallenPetal 接口定义了 9 个属性:
interface FallenPetal {
  x: number;        // 水平偏移 (相对树干中心)
  y: number;        // 垂直偏移 (相对地面)
  size: number;     // 花瓣大小 2~6px
  speedX: number;   // 水平速度 -0.3~0.3
  speedY: number;   // 下落速度 0.2~0.7
  rotation: number; // 当前旋转角
  rotSpeed: number; // 旋转速度 -0.03~0.03
  alpha: number;    // 透明度 0.3~0.8
  hue: number;      // 色相
}
10.2 粒子更新循环
每帧对每个花瓣做:
// 1. 风力漂移叠加到速度上
const windDrift = this.windStrength * 0.3 * Math.sin(this.time * 0.8 + i * 0.5);
p.x += p.speedX + windDrift;
p.y += p.speedY;

// 2. 旋转累积
p.rotation += p.rotSpeed;
10.3 边界重置
if (p.y > 300 || absX < -50 || absX > w + 50) {
  this.fallenPetals[i] = this.createRandomPetal();
  this.fallenPetals[i].y = -100;  // 从顶部重新入场
  this.fallenPetals[i].x = (Math.random() - 0.5) * w * 0.8;
  continue;
}
花瓣移出画布后,在画布上方重新生成新的花瓣,形成循环飘落的视觉效果。这里使用 Math.random() 重置位置是可以的,因为重置后花瓣从顶部进入,每帧的初始位置不同,不会产生"所有花瓣同步重置"的突兀感。
10.4 旋转拉伸绘制
ctx.save();
ctx.translate(drawX, drawY);
ctx.rotate(p.rotation);
ctx.beginPath();
ctx.arc(0, 0, p.size * 0.4, 0, Math.PI * 2);
ctx.scale(1.8, 1);           // X 方向拉伸 1.8 倍 → 椭圆
ctx.beginPath();             // 缩放后重新画弧
ctx.arc(0, 0, p.size * 0.4, 0, Math.PI * 2);
ctx.fillStyle = this.hsl(p.hue, 80, 65, p.alpha * (0.5 + 0.5 * Math.sin(this.time + i)));
ctx.fill();
ctx.restore();
这里有个小技巧:ctx.save() 保存当前变换矩阵,translate + rotate 将坐标系移至花瓣位置并旋转,scale(1.8, 1) 将圆在 X 方向拉伸 1.8 倍形成椭圆——模拟花瓣的扁平形状。save/restore 确保变换不影响后续绘制。
十一、性能优化
11.1 提前退出检查
Canvas 绘制的第一行代码是边界检查:
if (w <= 0 || h <= 0) return;
这在组件初始化和布局未完成时避免了无效绘制。当 Canvas 可见尺寸为 0 时,任何绘制操作都是无意义的。
11.2 确定性伪随机摊销
seededRandom 使用 Math.sin 和乘法取小数,单次调用耗时不高于 0.1μs。在最坏情况(14 层深度,约 1.7 万次递归调用)下,总共约 1.7ms——完全在 16ms 的帧预算内。
11.3 setTimeout vs requestAnimationFrame
HarmonyOS Canvas 目前没有标准化的 requestAnimationFrame 接口,因此选择 setTimeout 驱动:
setTimeout(animate, 16); // 目标 ~60fps
setTimeout 的精度在浏览器中约为 4ms,在 HarmonyOS 设备上实测约 4~8ms。16ms 的超时时间预留了 8~12ms 的绘制窗口,确保即使单帧绘制耗时 8ms,下一帧仍能在 24ms 内完成,帧率维持在 40~60fps。
11.4 深度限制
recursionDepth 的 Slider 范围限制在 6~14,防止用户误拉到 20+ 层导致 O(2^depth) 的爆炸增长。14 层已经是视觉和性能的合理平衡点。
11.5 路径合并
每条枝条只用一个 beginPath + lineTo 绘制,不创建额外的路径对象。HarmonyOS Canvas 的路径状态机是轻量级实现,频繁 beginPath 的开销可以接受。
对于花瓣中的多个圆形,也是每个圆独立 beginPath → arc → fill,因为弧形路径不能批量合并。
11.6 Canvas 尺寸自适应
const w = ctx.width;
const h = ctx.height;
ctx.width 和 ctx.height 由父容器的布局约束决定,自适应屏幕旋转和窗口尺寸变化。所有坐标计算都基于 w 和 h,因此无需额外的适配代码。
十二、可视化参数调优
可调参数表
| 参数 | 范围 | 默认值 | 视觉效果变化 |
|---|---|---|---|
| 深度 | 6~14 | 10 | 树冠密度的主控——6 层稀疏分明,14 层密如云团 |
| 展开 | 10°~50° | 28° | 树冠宽度——小角度呈柱状,大角度呈伞状 |
| 衰减 | 0.50~0.85 | 0.72 | 枝条长度——高衰减分形深、树冠大;低衰减分形浅、树冠小 |
| 风力 | 0~1.0 | 0.4 | 摇曳幅度——0 静止如画,1.0 剧烈摇摆 |
| 色调 | 0°~360° | 130° (青绿) | 季节主题——30° 秋色,120° 夏绿,320° 粉色梦幻 |
设计原则
深度 + 衰减联动调整:衰减大(接近 0.85)时,枝条长度缩短慢,树冠层数更多。此时建议将深度调低 1~2 层,否则枝条末端会非常密集。反之,衰减低(0.5)时,枝条缩短快,深度可调高至 12~14 层。
展开 + 风力互补:展开角度大(>40°)时树冠宽,建议风力调低(<0.3),否则树冠左右摇摆幅度过大,画面失衡。展开角度小(<20°)时树冠窄,风力可适当调高。
色调切换:将 hueBase 从 130 逐步滑向 30(秋季色),可以实时看到树从青绿变为金黄再到棕红,地面的背景色也同步变化——因为背景渐变也使用了 this.hsl(this.hueBase, ...)。
十三、扩展思路
13.1 季节自动变化
可以在 drawTree 中让 hueBase 随时间缓慢周期性变化:
this.hueBase = 30 + 100 * (0.5 + 0.5 * Math.sin(this.time * 0.02));
这样树色会在 30(秋)→ 130(青绿)→ 30(秋)之间循环,模拟四季更替。
13.2 触摸交互
可以添加 onTouch 事件,让手指在画布上移动时触发"吹风"效果——手指位置影响风场的强度和方向:
.onTouch((event: TouchEvent) => {
  const touchX = event.touches[0].x;
  const touchRatio = (touchX / w) * 2 - 1;  // -1 ~ 1
  this.windStrength = Math.abs(touchRatio);
  // 风向: touchRatio 正负决定风从左吹还是右吹
  this.windDirection = touchRatio;
})
然后在风场公式中引入 windDirection 偏移角的正负。
13.3 树木生长动画
初始时 recursionDepth = 0,然后随时间缓慢增加:
if (this.recursionDepth < this.targetDepth) {
  this.recursionDepth += 0.05;  // 每帧增加 0.05
}
由于 depth 是整数比较,0.05 的累加意味着约 20 帧(0.3 秒)增加一层,14 层树约 4.2 秒生长完毕。视觉效果上,树从地面"长"到完整的树冠。
13.4 添加果实/萤火虫
在树冠区域内随机生成一些发光的圆点(萤火虫),使用 Canvas 的 shadowBlur 产生发光效果:
ctx.shadowBlur = 15;
ctx.shadowColor = this.hsl(hue, 90, 80, 1);
ctx.beginPath();
ctx.arc(fx, fy, 2, 0, Math.PI * 2);
ctx.fillStyle = this.hsl(hue, 90, 85, 0.8);
ctx.fill();
ctx.shadowBlur = 0;
13.5 多棵树森林
在 drawTree 中循环调用多次 drawBranch,每次改变起始位置和缩放:
const trees = [
  { x: w * 0.2, scale: 0.6, depth: 7 },
  { x: w * 0.5, scale: 1.0, depth: 10 },
  { x: w * 0.8, scale: 0.7, depth: 8 }
];
for (const t of trees) {
  this.drawBranch(ctx, t.x, groundY, trunkLength * t.scale, -π/2, 0, t.depth, baseWidth * t.scale);
}
注意每棵树使用不同的深度和缩放,形成近大远小、疏密有致的森林效果。
十四、总结
14.1 项目结构
entry/src/main/ets/pages/
├── Index.ets              # 入口,挂载 TreeFractalPage
├── TreeFractalPage.ets    # 递归二叉树分形组件 (核心)
├── KaleidoscopePage.ets    # 万花筒 (可切换)
└── SixStarPage.ets        # 六芒星 (可切换)
14.2 API 24 配置确认
build-profile.json5 中的关键配置:
{
  "products": [{
    "name": "default",
    "targetSdkVersion": "6.1.1(24)",
    "compatibleSdkVersion": "6.1.1(24)",
    "runtimeOS": "HarmonyOS"
  }]
}
14.3 从本项目中可以学到的
- 递归分形的数学建模:用极少的代码(一个递归函数)生成高度复杂的自相似结构
- 确定性伪随机:seededRandom 的编写和使用场景
- HSL 色彩插值:在 Canvas 动画中实现平滑渐变的正确方式
- 粒子系统设计:属性定义、更新循环、边界重置、变换绘制
- 正弦波动画:时间+空间的二维正弦波叠加,模拟自然风场
- 组件生命周期:aboutToAppear/aboutToDisappear 的正确使用模式
- Canvas 性能:限制递归深度、提前退出、状态栈管理
实现了从数学到渲染的完整管线,是学习 HarmonyOS Canvas 动画的优质实战案例。

讨论HarmonyOS开发技术,专注于API与组件、DevEco Studio、测试、元服务和应用上架分发等。
更多推荐

 0
0 0
0- 0


 已为社区贡献52条内容

所有评论(0)